User Guide
This document is updated with each release.
Current relevant version - 0.8.0 Beta to be released on 17 June 2026
Starting version 0.8.0 - Felicity is free to use for both personal and commercial use.
What Is This App?
Felicity (previously called Face Recognition Photo Organizer) is a desktop app for Windows that automatically finds and groups all the photos of the same person across your whole photo collection. Instead of sorting thousands of photos by hand, the app looks at the faces for you and puts every photo of the same person together.
You never have to tag anything manually. You point the app at your photo folders, it does the work, and then you simply give the people real names.
Your original photos are never changed. The app only reads them; it never moves, renames, edits, or deletes them.
New Features in 0.8.0 Beta
Here is what is new in this release, in plain terms:
- Light and Dark themes, plus 12 accent (highlight) colours to choose from.
- Accessibility options: increase contrast, bold text, dyslexia-friendly fonts, and colour-blindness assist filters.
- Export photos into folders - save one person, several people, or everyone into neat per-person folders on your disk.
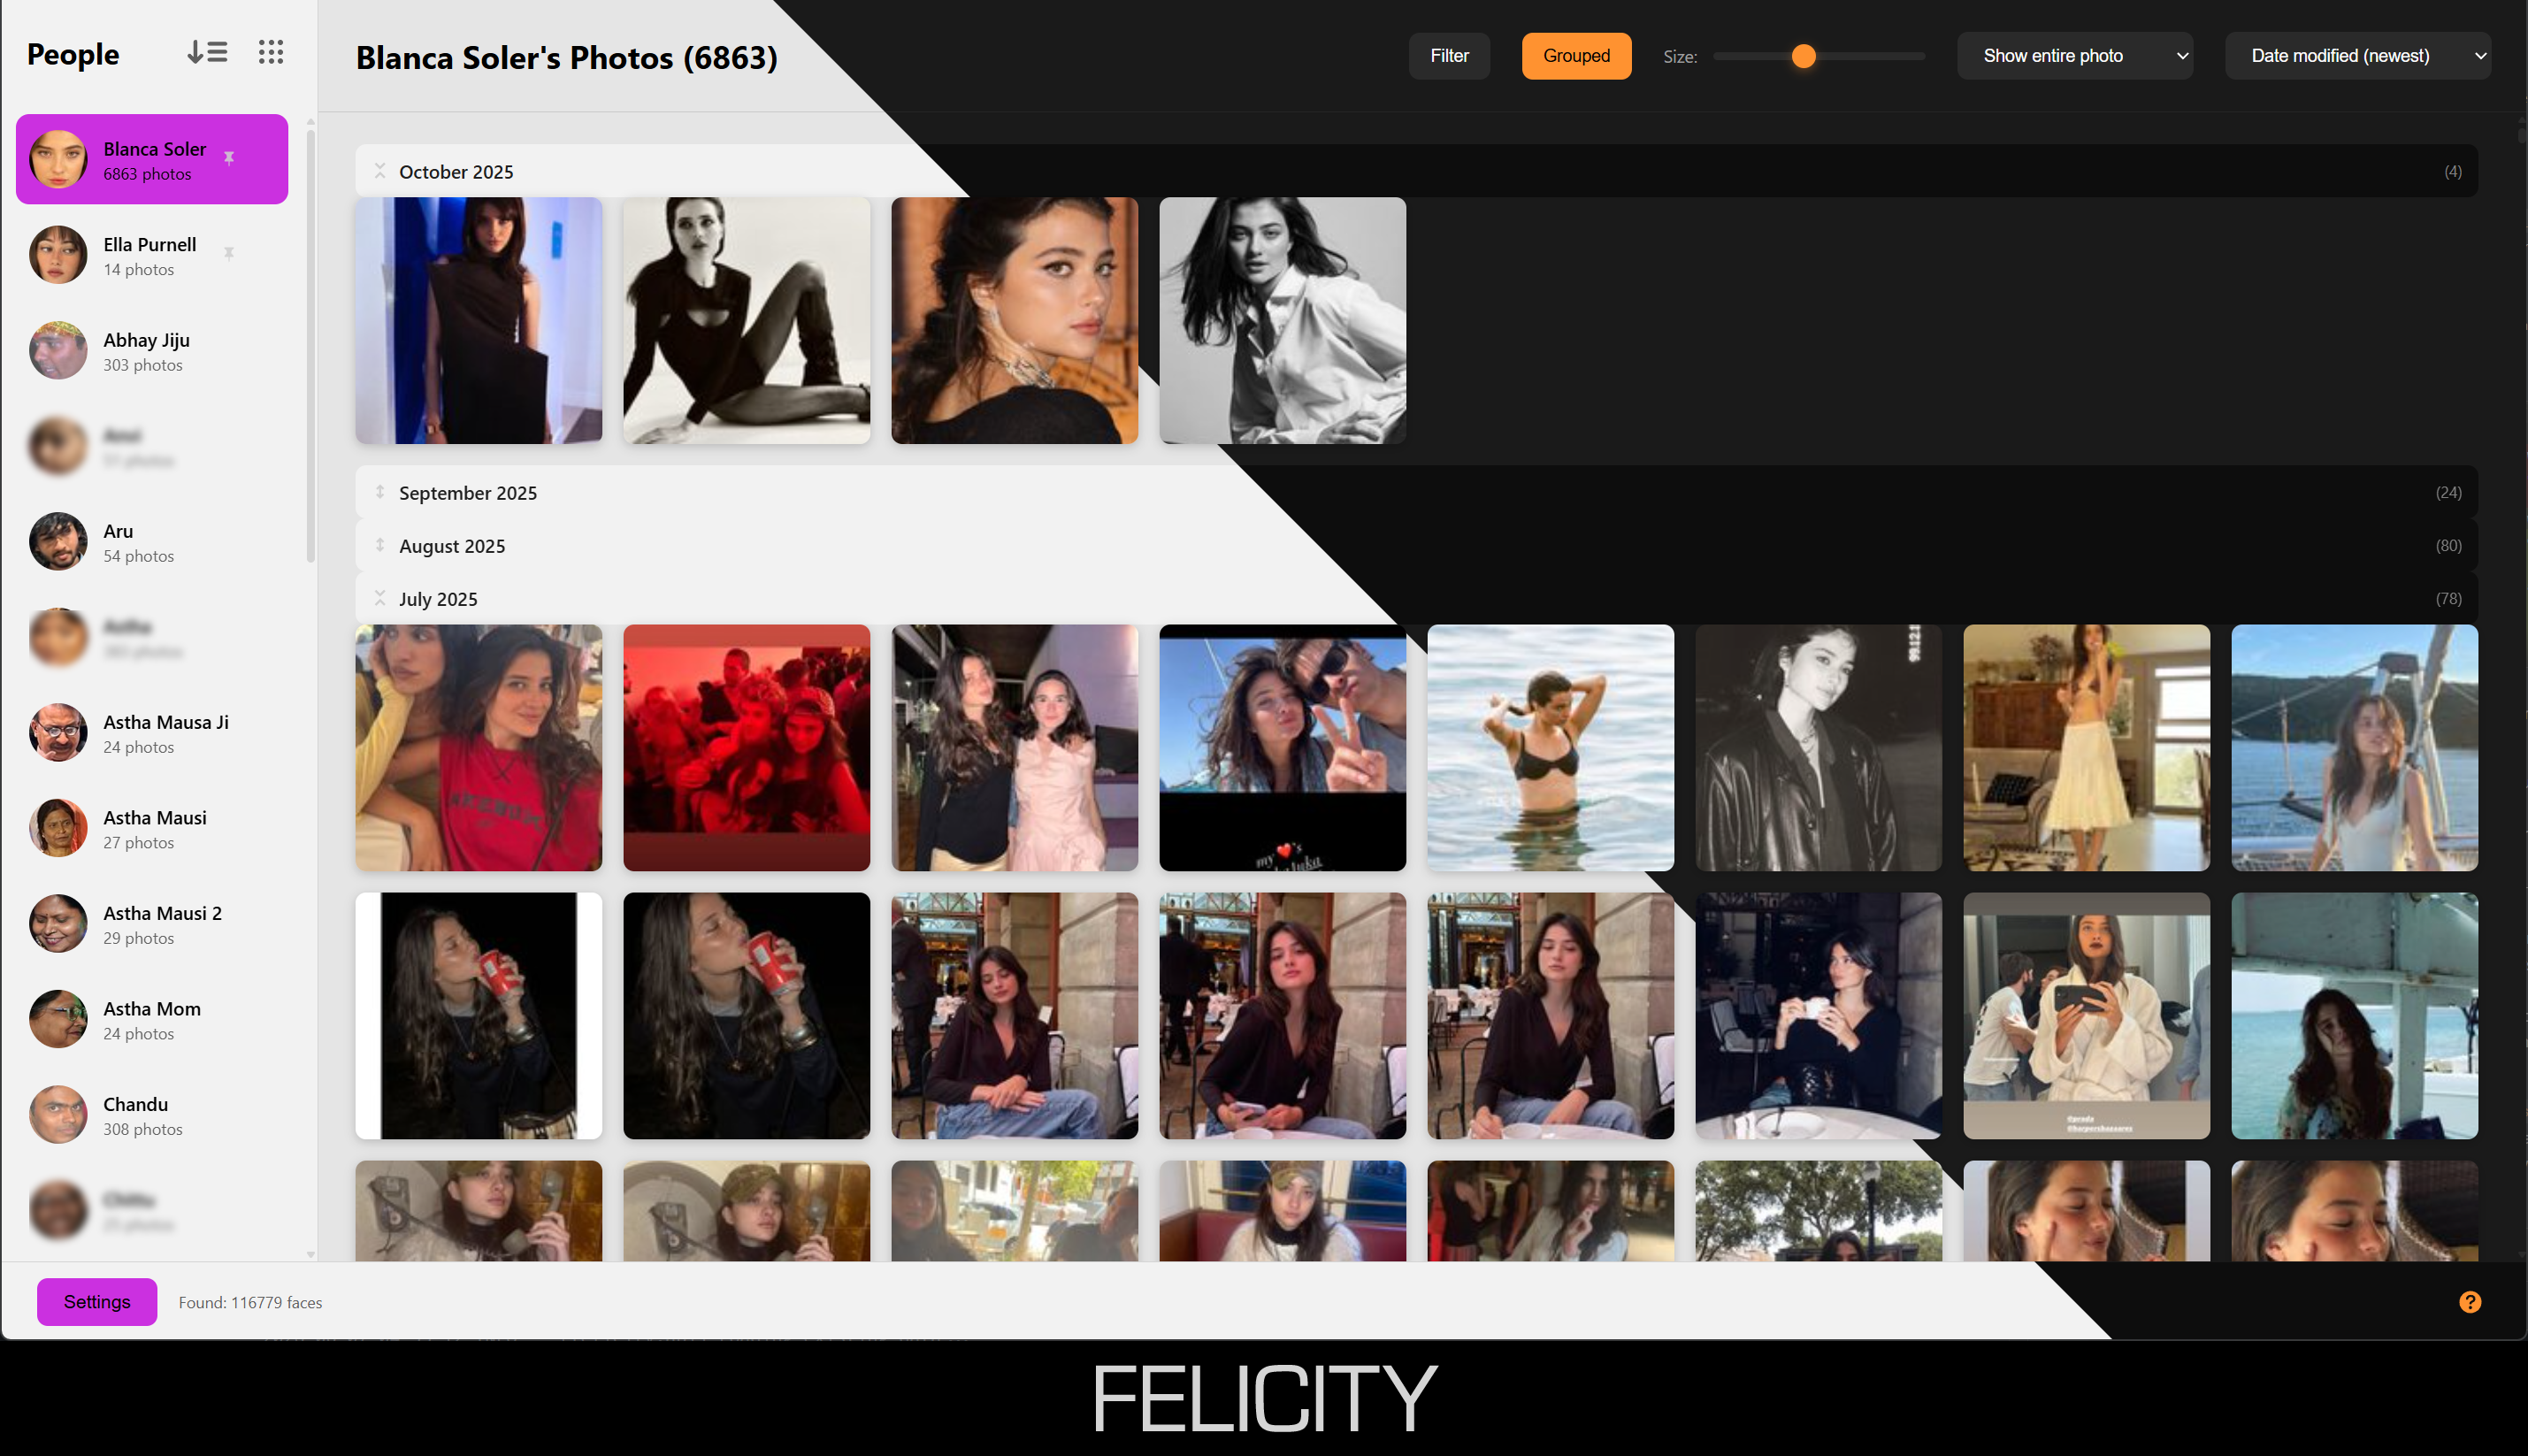
- Sort, Filter, and Group a person's photos - reorder by name or date, hide certain file types, or split the grid into sections by folder, date, or camera.
- A bigger photo preview with a side panel that shows the photo's details (file name, size, date taken, camera, and more).
- Pin people to the top of the list so your most important people are always easy to find.
- Select several people at once and act on them together (export, pin, or hide).
- Duplicate photos are shown once per person, so a collage or a duplicate file no longer fills the grid with repeats.
- XMP sidecar files - optionally save the face names so other photo apps (like digiKam or Lightroom) can read them.
- A redesigned Settings screen with six clear sections, a new About page, and an improved log with a Normal/Debug detail level.
- A cleaner bottom bar that combines the Settings button, status text, progress bar, and Help button into one row.
How It Works
The app works in two simple steps:
- Scan your photos - The app looks through your photo folders one time to find every face.
- Group similar faces - Faces that look alike are automatically put together as the same person.
Once the first scan is done, you can change how strict the matching is at any time without scanning everything again. This is fast and you can experiment freely.
Getting Started
First Launch
The first time you open the app, you will see a message that says "No Folders to Scan". This is normal - the app does not yet know where your photos are.
Click the "Take me to settings" button to add your photo folders.
Adding Photo Folders
- Click the Settings button at the bottom-left of the window.
- In the list on the left of Settings, click Folders to Scan.
- Under "Include folders for scanning", click the + Add Folder button.
- Choose the folder that has your photos in it, and click OK.
- Repeat for any other photo folders you have.
- Click Close Settings at the bottom-left.
The app now starts scanning your photos automatically. The very first scan can take a while depending on how many photos you have - this is normal, and it only happens once.
Supported photo types: JPG, JPEG, PNG, BMP, GIF, HEIC, and HEIF.
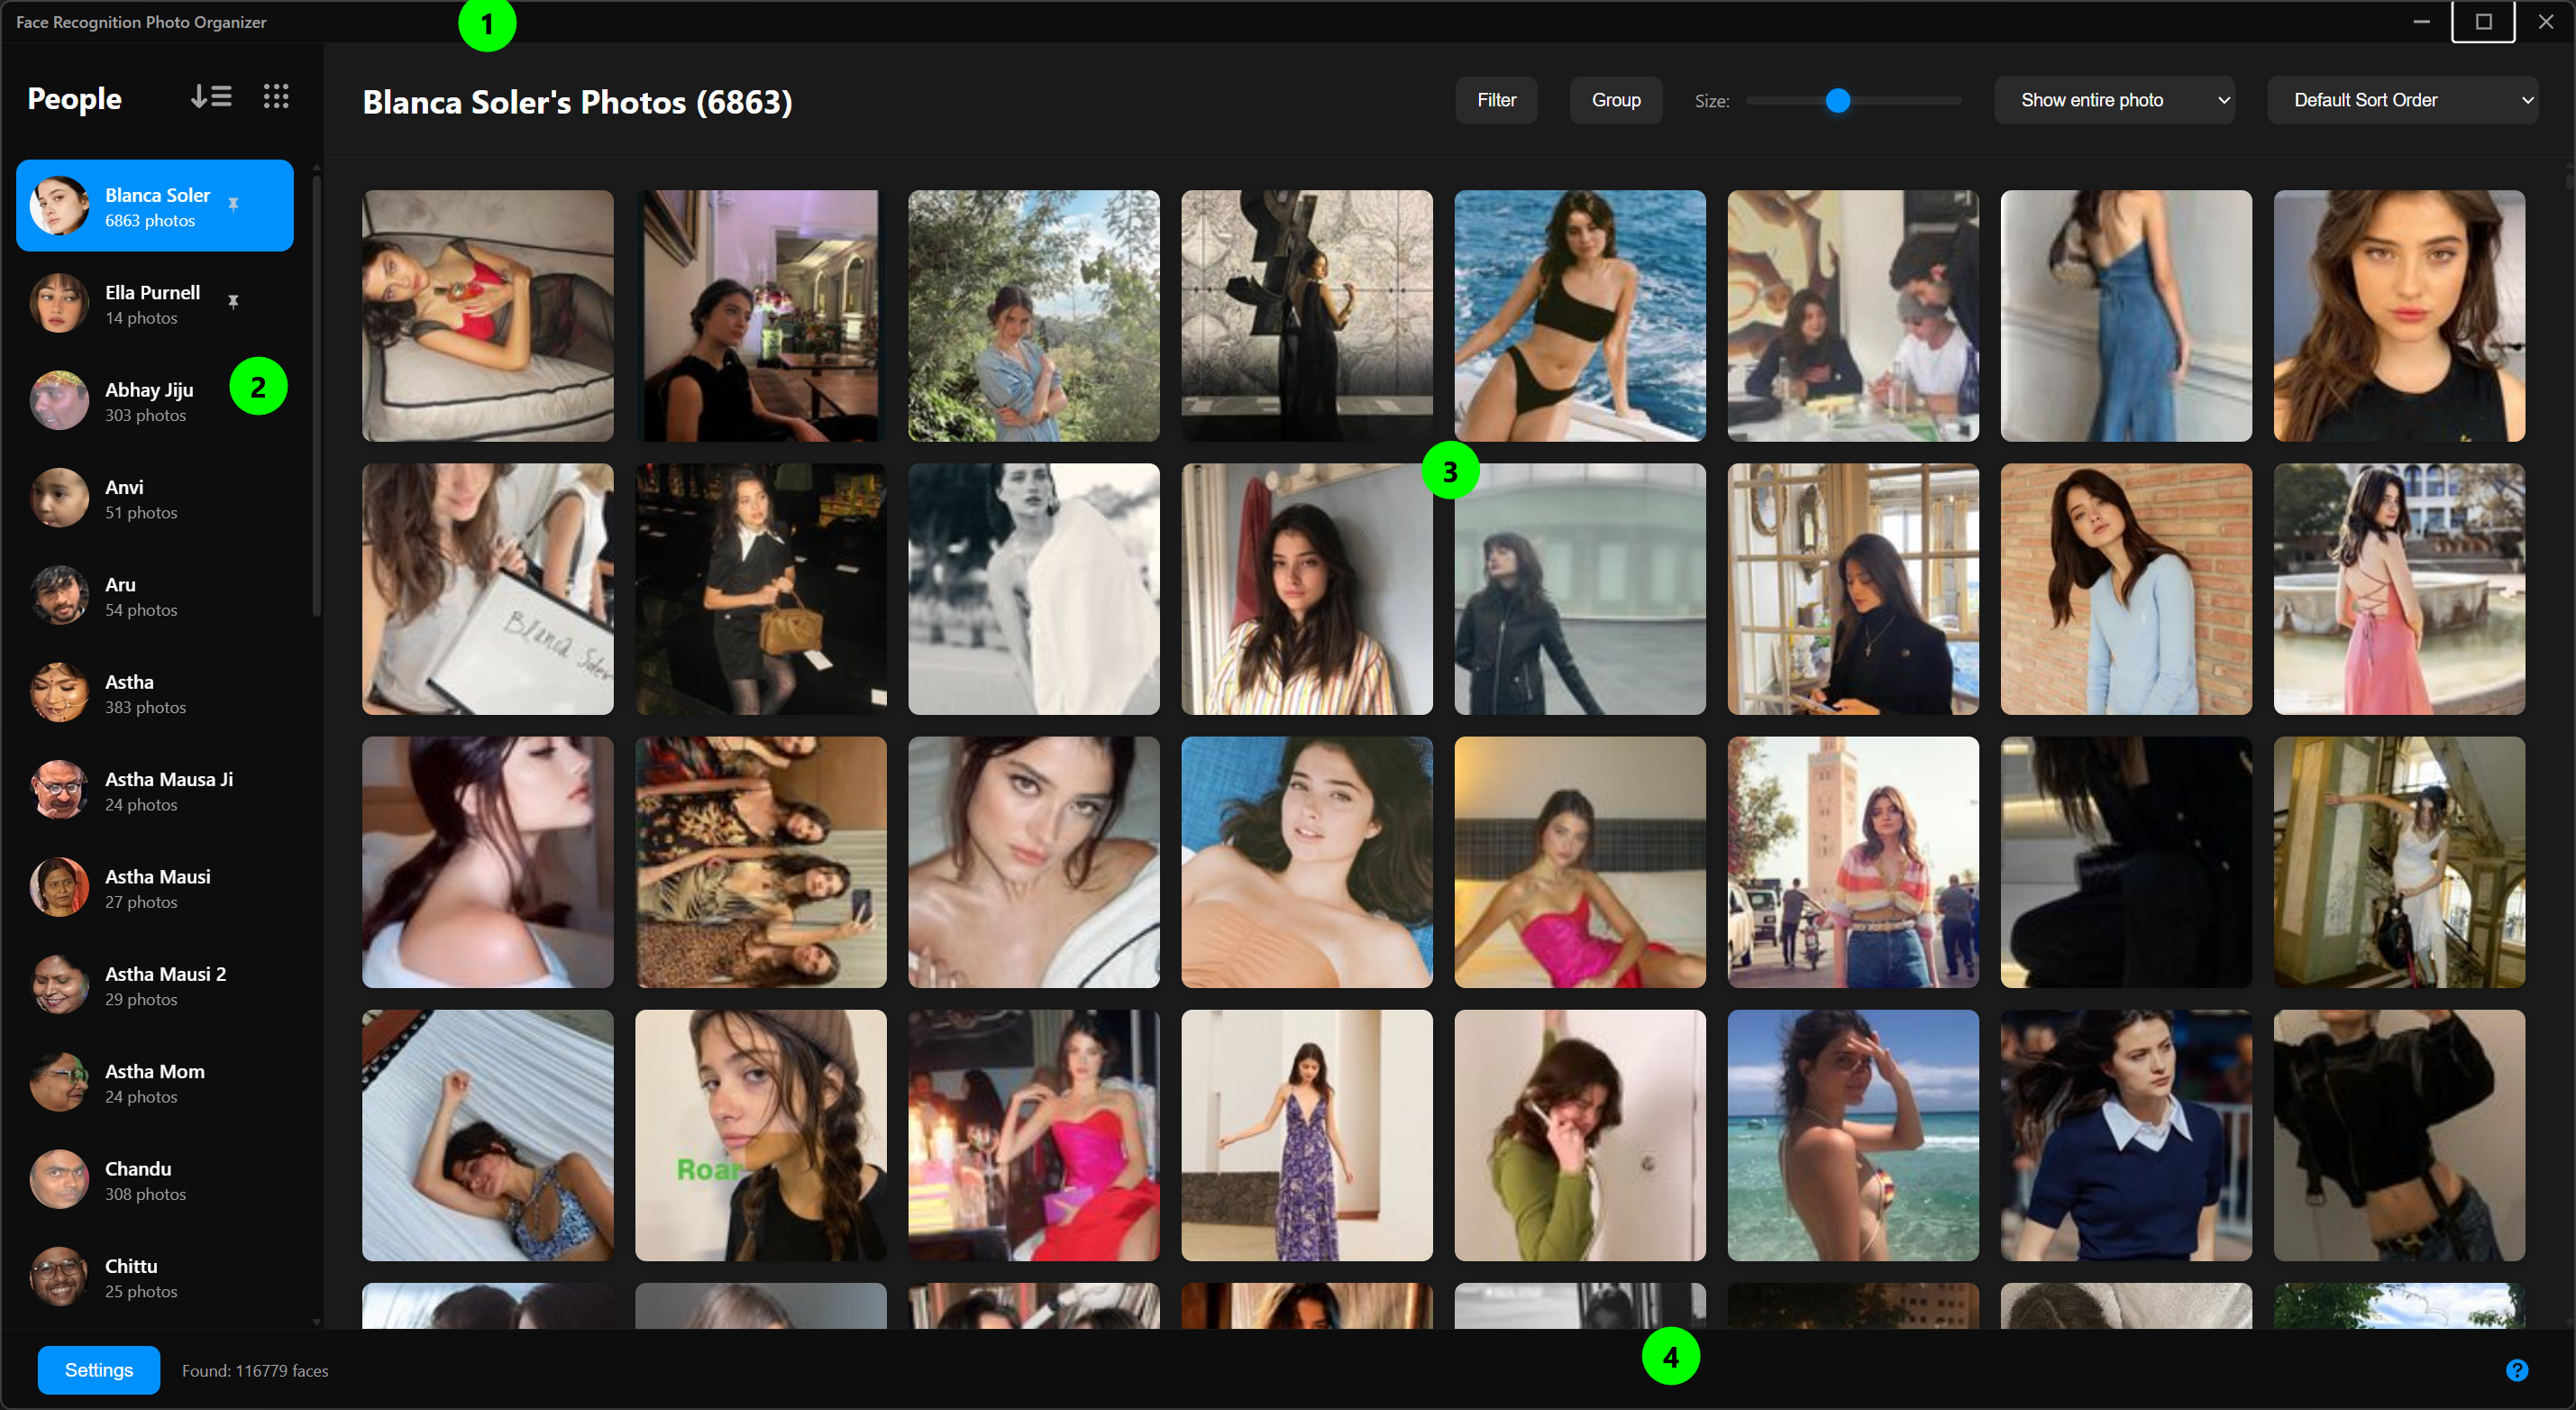
Understanding the Interface
The window has a few main areas: the title bar along the top, the People list on the left, the Photo area on the right, and the Bottom bar along the bottom.
The Title Bar (top of the window)
At the very top-right of the window there are three small buttons:
- Minimize (the dash) - hides the window. If "Close to tray" is on, the app keeps running in the background.
- Maximize (the square) - makes the window fill the screen, or returns it to its previous size.
- Close (the X) - closes the window. If "Close to tray" is on, this hides the app to the system tray instead of quitting it (see General Settings).
The People List (left side)
- This shows every person the app has found.
- Until you rename them, people are listed as "Person 1", "Person 2", and so on.
- Each row shows a small face thumbnail and how many photos that person appears in.
- Click a person to see all of their photos on the right.
At the top of the People list there are two small buttons:

- Sort people (the lines icon) - click it to choose how the list is ordered: by name (A to Z or Z to A) or by number of photos (low to high or high to low).
- Jump to (the grid-of-dots icon) - this appears when you are sorting by name. Click it to get an A-Z list, then click a letter to jump straight to names starting with that letter.
The Photo Area (right side)
When you click a person, their photos appear here as thumbnails. Along the top of this area you will find:
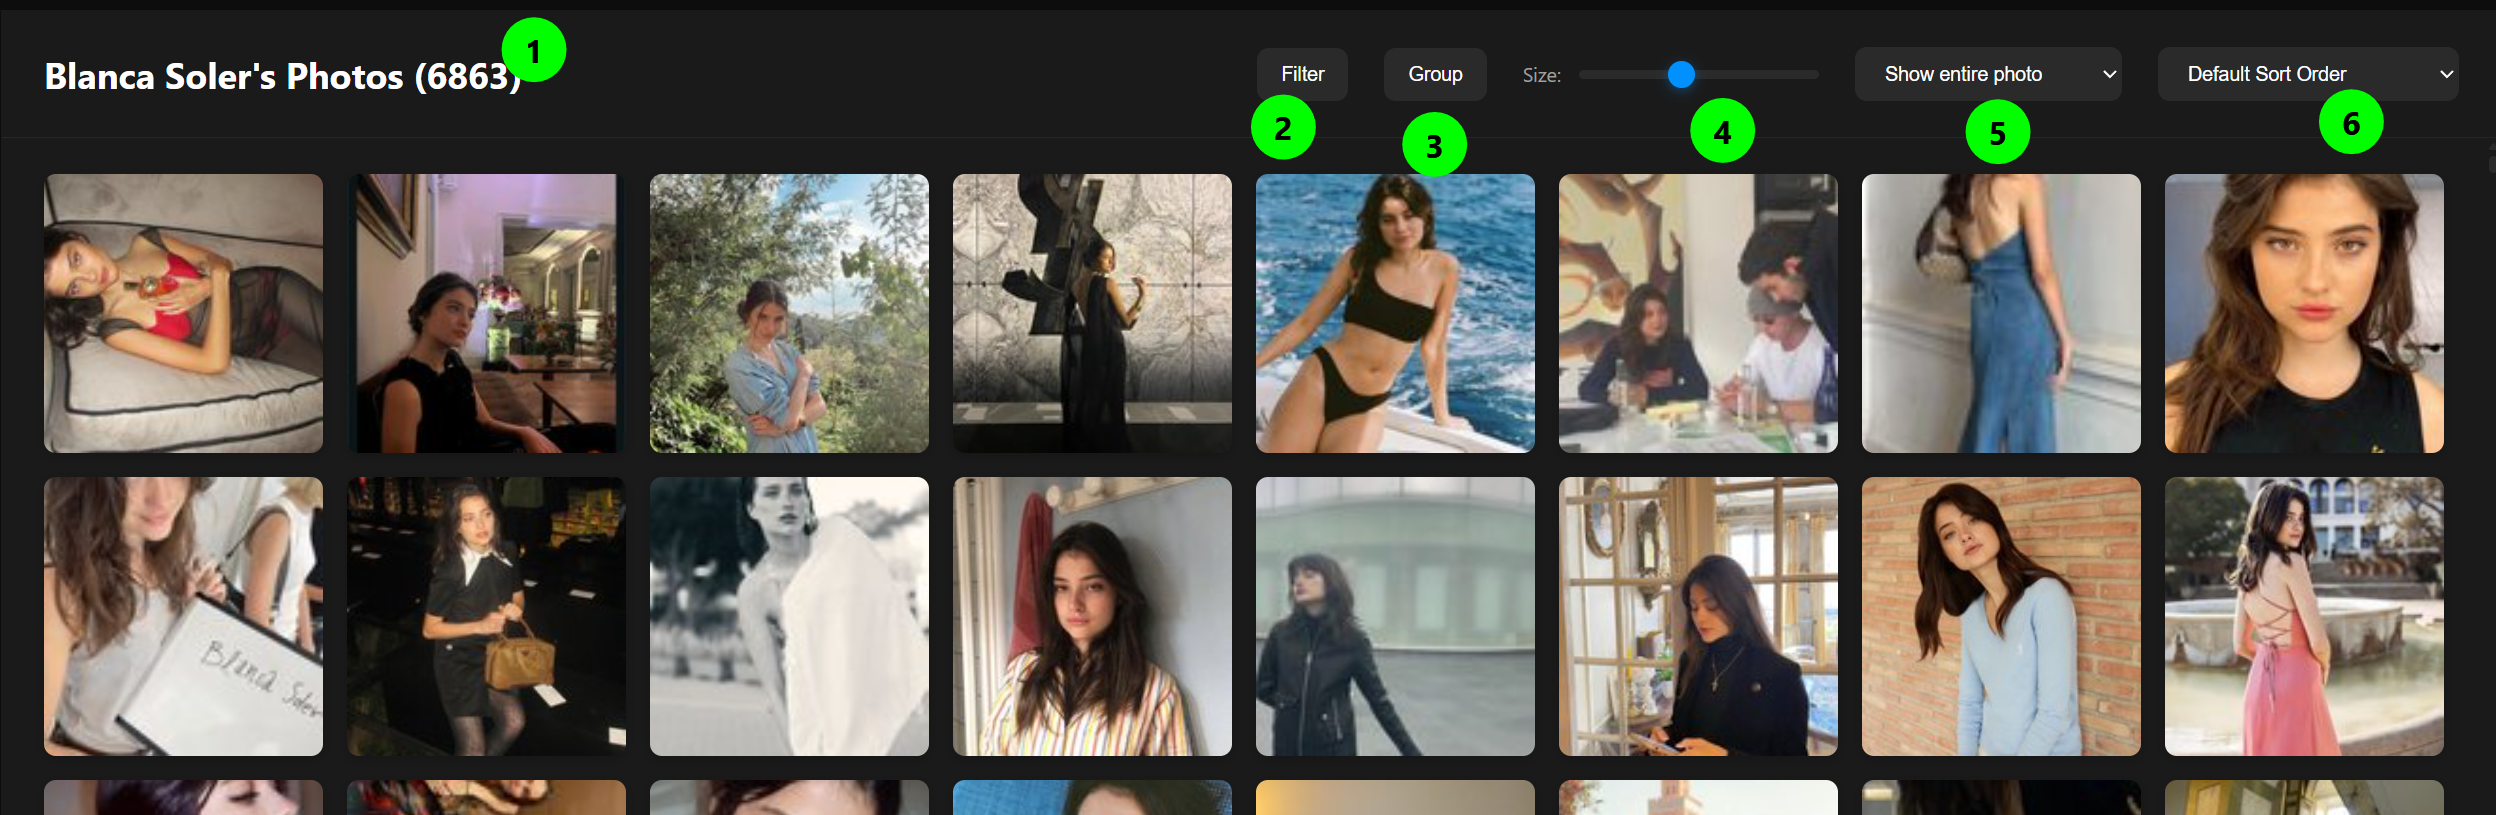
- The person's name on the left.
- Filter button - choose which photos to show (see Filtering Photos).
- Group button - split the photos into sections, for example by date or folder (see Grouping Photos).
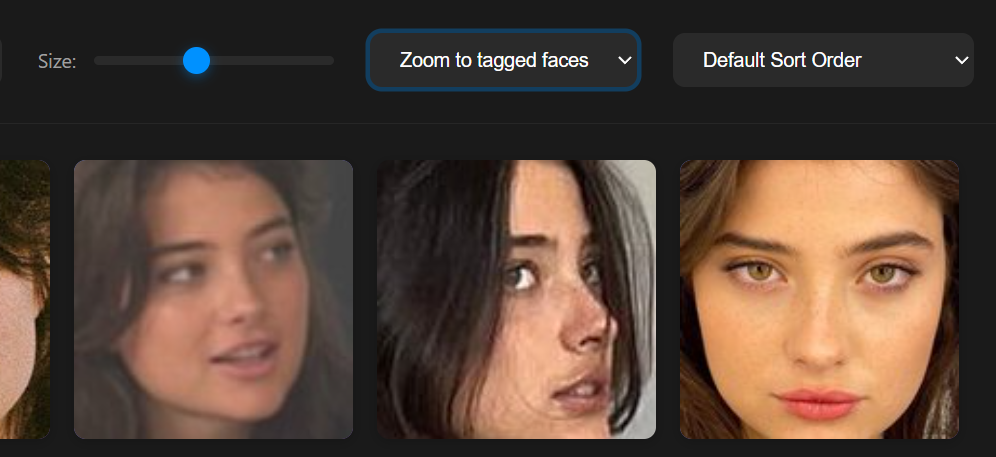
- Size slider - drag it left or right to make the thumbnails smaller or larger.
- View mode dropdown:
- Show entire photo (default) - thumbnails show the whole picture.
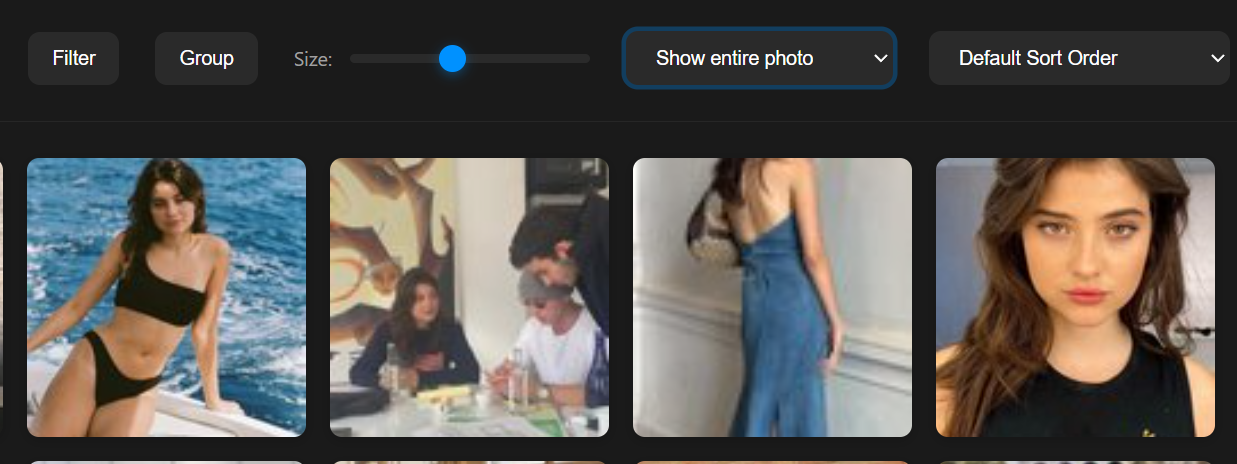
- Zoom to tagged faces - thumbnails zoom in to just this person's face. This is very handy for finding someone in group photos.
- Sort dropdown - choose the order of the photos (see Sorting Photos).
To work with a single photo:
- Single-click a photo to open a large preview inside the app.
- Double-click a photo to open it in your computer's normal image viewer.
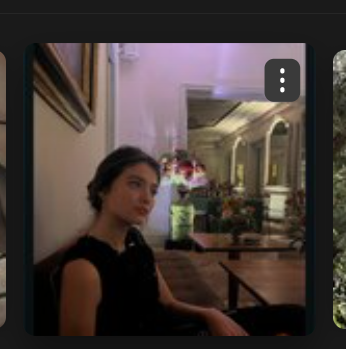
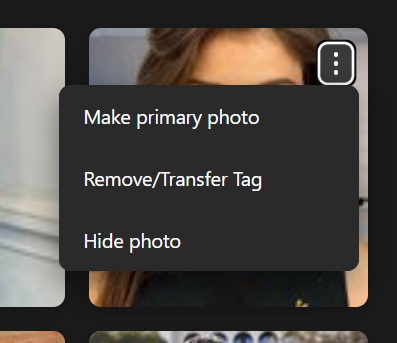
- Right-click a photo (or click its three-dot menu) for more options. The three dot menu appears only on hover.
The Bottom Bar
The bottom of the window is a single row with:
- Settings button (left) - opens the Settings screen.
- Status text (middle) - normally shows something like "Found: 1,234 faces". While the app is busy, it shows what it is doing instead.
- Progress bar - appears only while the app is scanning, exporting, or otherwise working. A Cancel button appears next to it for actions you can stop (such as exporting).
- Help button (right, the "?" icon) - opens a quick tips window.
Working with People
Viewing Someone's Photos
- Click a person's name in the left list.
- All of their photos appear on the right.
- Single-click any photo for a large preview, or double-click to open it in your normal image viewer.
Renaming a Person
People start with placeholder names like "Person 1". Giving them real names makes everything easier, and the app remembers the name forever.
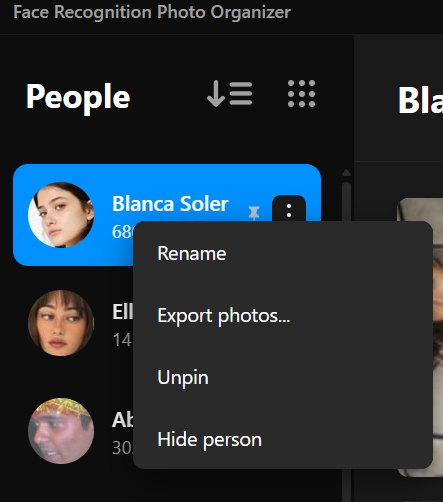
- Find the person in the left list.
- Click the three-dot menu next to their name (or right-click the row).
- Click Rename.
- Type the person's real name.
- Click Confirm.
From now on, every photo of that person is tagged with that name - even after you change settings or add new photos later.
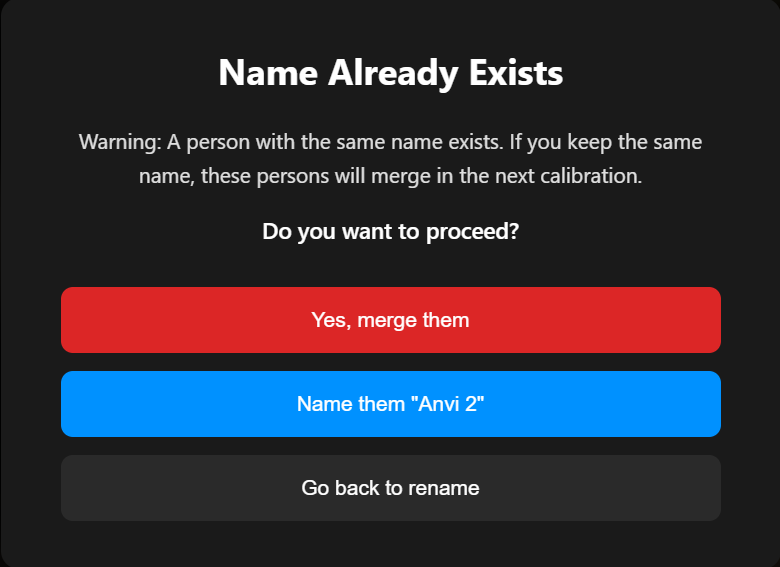
If you type a name that already belongs to someone else, the app asks what you want to do: merge the two people, choose a different name, or go back. This is useful when the same person was accidentally split into two entries - giving them the same name merges them on the next recalibration.
Setting a Cover or Thumbnail (Primary) Photo
The first photo shown for a person is their "cover" photo (also called the primary photo). You can pick a better one:
- Click the person to show their photos.
- Find the photo you want as the cover.
- Right-click it (or use its three-dot menu) and click Make primary photo.
That person's thumbnail in the People list now uses this photo.
Pinning a Person to the Top
Pinning keeps your favourite or most-used people at the top of the list, no matter how the list is sorted.
- Click the three-dot menu next to a person (or right-click the row).
- Click Pin.
A small pin icon appears on the right edge of that person's row, and they move to the top. To undo this, open the same menu and click Unpin.
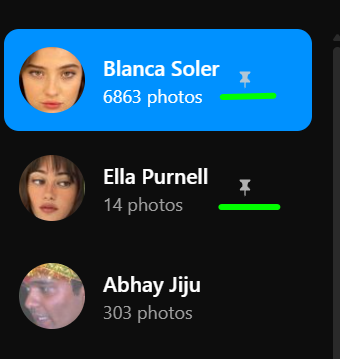
If you pin several people, they all sit at the top together and stay in your chosen sort order among themselves.
Selecting Several People at Once
You can act on more than one person at the same time, the same way you would select multiple files in Windows:
- Ctrl-click a person to add or remove them from your selection.
- Shift-click a person to select everyone between your last click and this one.
- A small bar appears showing how many people are selected, with a Clear button. Pressing Esc also clears the selection.
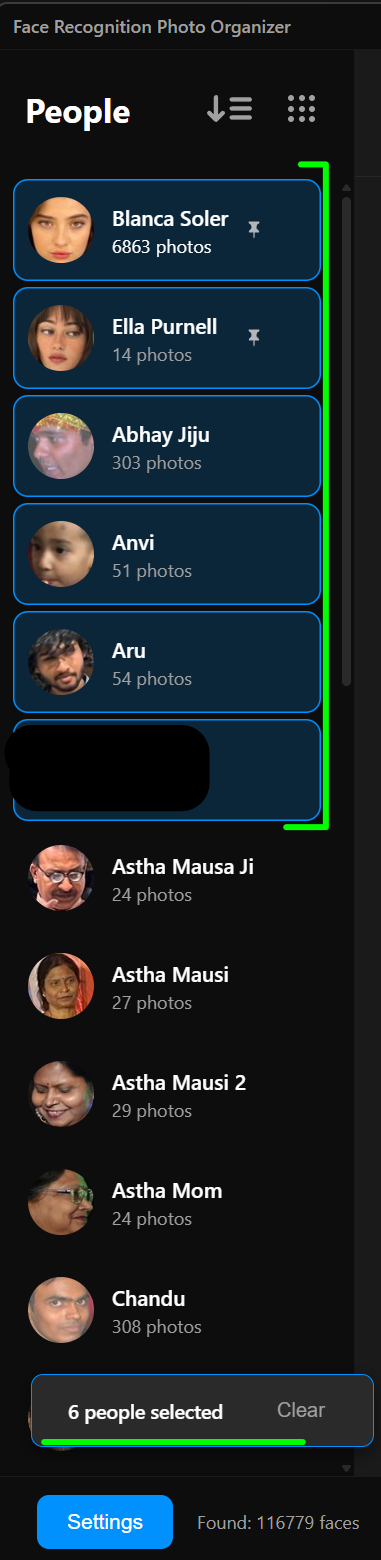
While two or more people are selected, opening the menu (three dots or right-click) shows group actions:
- Export Selected to Folder - save all the selected people's photos at once.
- Pin / Unpin - shown only when all selected people are in the same state.
- Hide / Unhide - shown only when all selected people are in the same state.
Hiding a Person
If someone appears in your photos but you do not want to see them in the list:
- Click the three-dot menu next to their name (or right-click the row).
- Click Hide person.
They disappear from the list. To bring hidden people back, turn on Show hidden person in General Settings. Hidden people then reappear with "(hidden)" after their name, and you can Unhide them from their menu.
Working with Photos
Previewing a Photo (the big view)
Single-click any thumbnail to open the large preview (also called the lightbox). The preview fills the screen and has two parts:
- The photo on the left.
- A "Details" panel on the right that lists information about the photo, such as the file name and path, the image size, the file size, the date it was taken, and the camera that took it. Only the details that the photo actually contains are shown.
Controls in the preview:
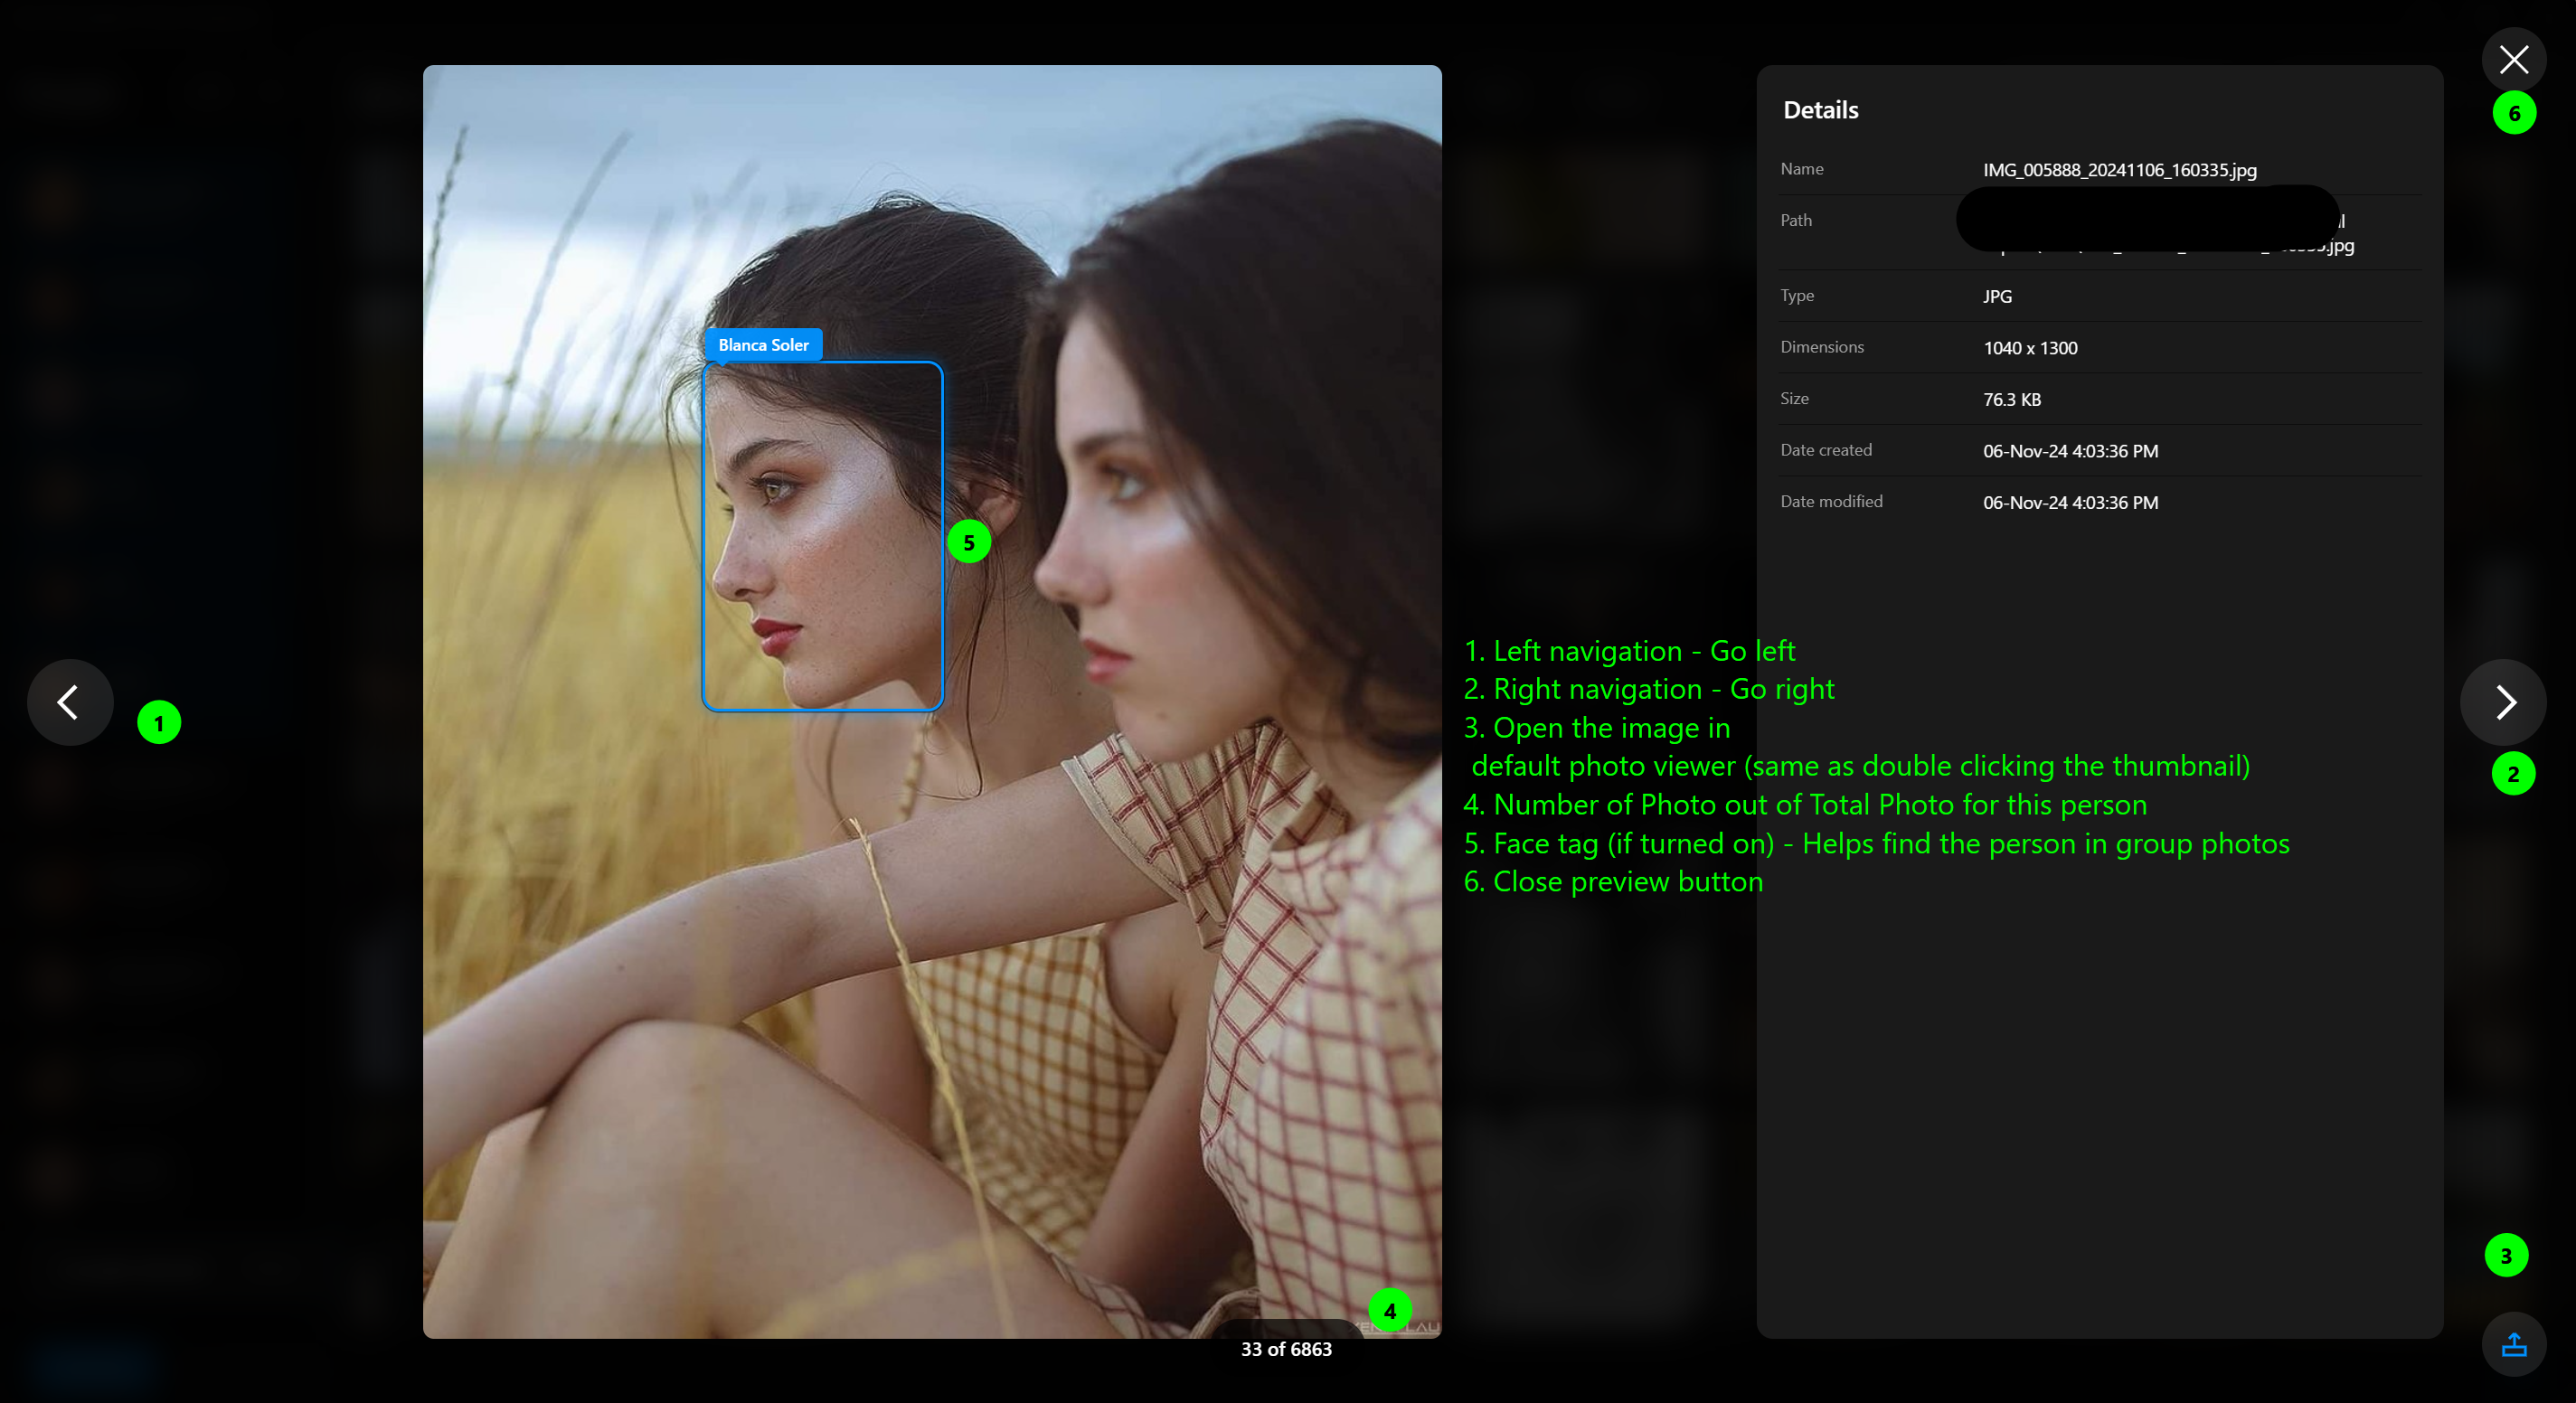
- Left and right arrows (on screen, or the Left/Right keys on your keyboard) - move to the previous or next photo.
- The counter at the bottom shows which photo you are on (for example "3 of 50").
- The open-in-app button at the bottom-right (the blue arrow-out-of-a-box icon) - opens the photo in your computer's normal image viewer.
- The X at the top-left, or the Esc key - closes the preview.
If face tags are turned on, you will also see the person's name marked on the photo, which helps you spot them in a group shot. You can turn this on or off with "Show face tags in full screen image previews" in General Settings.
Sorting Photos
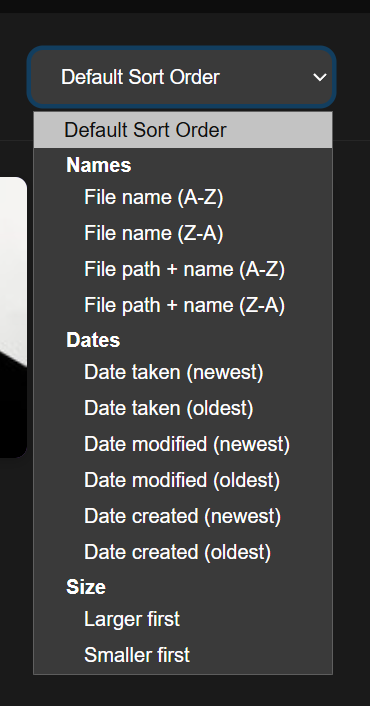
Use the Sort dropdown at the top-right of the photo area to reorder a person's photos. The choices are grouped:
- Names: File name (A-Z or Z-A), or File path + name (A-Z or Z-A).
- Dates: Date taken, Date modified, or Date created - each newest-first or oldest-first.
- Size: Larger first or Smaller first.
Date and Size options only appear when enough of the person's photos actually carry that information (at least half). Photos that are missing a date always sit at the bottom - the app never makes up a date it does not have.
Filtering Photos
Click the Filter button at the top of the photo area to narrow down what is shown:
- File type - tick or untick boxes (for example JPG, PNG, HEIC) to show only certain kinds of file.
- Path contains - type some text to show only photos whose folder or file name contains that text.
- Clear filters - removes all filters and shows everything again.
A filter only affects the person you are currently viewing.
Grouping Photos

Click the Group button to split the grid into labelled sections. Pick one of:
- Folders - one section per folder the photos live in.
- Date taken, Date modified, or Date created - by Days, Weeks, Months, or Years.
- Others - Camera make/model.
- No grouping - returns to a single, flat grid.
Each section has a heading you can click to fold it open or closed. As with sorting, date and camera options only appear when enough photos carry that information, and anything without a value goes into a "No Data Available" section at the bottom.
Hiding Individual Photos
To hide one photo without hiding the whole person:
- Right-click the photo (or use its three-dot menu).
- Click Hide photo.
To see hidden photos again, turn on Show hidden photos in General Settings. Hidden photos then appear with diagonal lines across them, and you can Unhide them from the same menu.
Removing or Moving a Photo (Remove/Transfer Tag)
Sometimes the app puts a photo with the wrong person, or you simply want to move it to someone else. You can fix this by hand, one photo at a time.
- Right-click the thumbnail in the grid (or click its three-dot menu).
- Click Remove/Transfer Tag.
- A window titled "Transfer Face To..." opens.
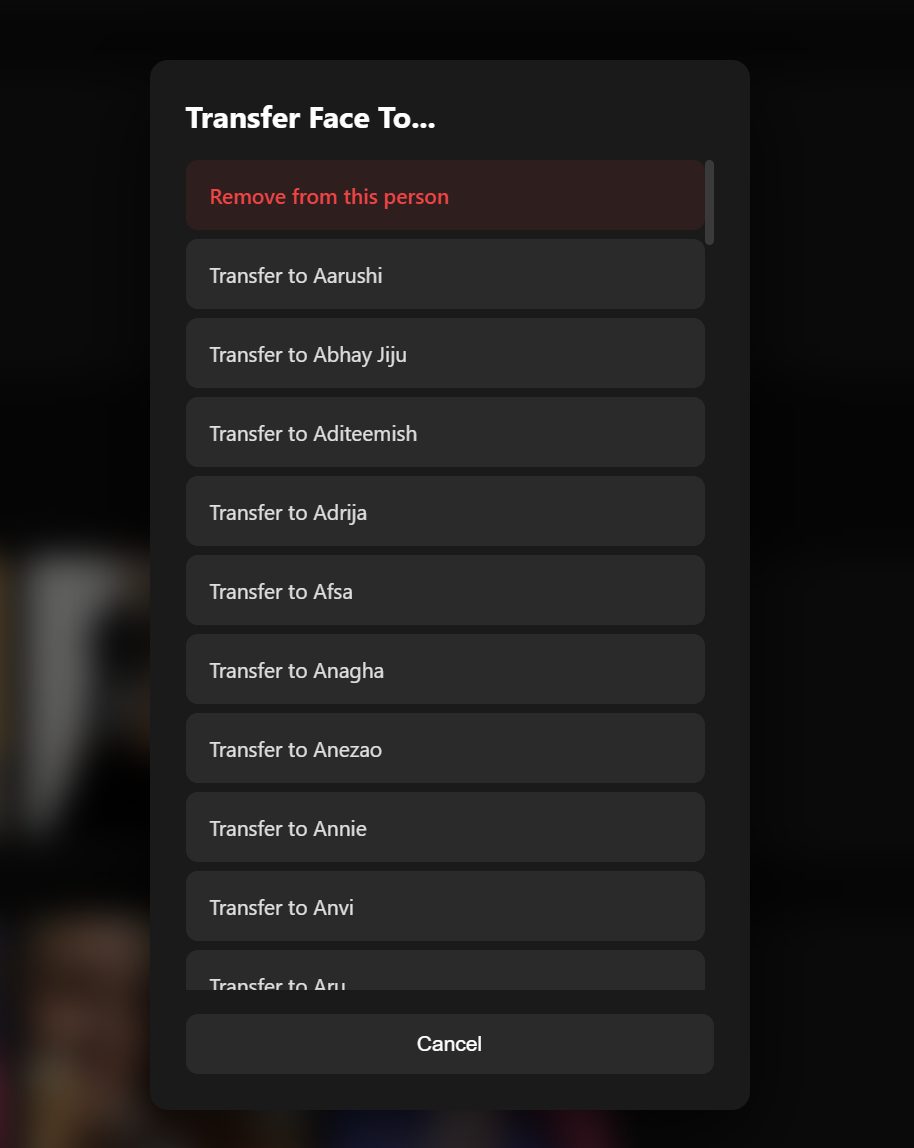
The window lists every person you have named - whether they are currently hidden or not. (Unnamed people such as "Person 1" and the "Unmatched Faces" group never appear here, since you can only move a photo to a real, named person.) If the list is long, scroll down to find the right person.
Your two choices are:
- Remove from this person (the red option at the top) - takes the photo out of this person's group. It is not deleted; it is sent back to Unmatched Faces. Use this when a photo was matched to the wrong person and there is no one to move it to.
- Transfer to [Name] - moves the photo into that person's group instead. Click the name you want.
Click Cancel to close the window without changing anything.
If this person appears in the same photo more than once (or you picked several photos), the options show a count, such as "Transfer to Anagha (3 photos)", and the action applies to all of them at once - but only for this person. Other people in the same photo are left alone.
This makes future results better. These manual corrections are remembered. The next time the app recalibrates (for example after you change the threshold or add new photos), it treats your choices as a strong hint about who is who, so its automatic grouping becomes more accurate over time. In short, every time you fix a photo by hand, you are also teaching the app.
About Duplicate Photos
Each person's grid shows one tile per photo file. If the same person appears more than once in a single picture (for example a collage), or if you have the exact same file saved in two places, the app shows it just once for that person instead of repeating it. The photo still appears for every different person who is in it.
Exporting Photos into Folders
Exporting saves copies of your photos into tidy folders - one folder per person - at a place you choose. Your original photos are never moved or changed.
Export One Person
- Click the three-dot menu next to a person (or right-click the row).
- Click Export photos....
- Choose where to save them.
Export Selected or All People
- Open Settings and click Export Photos.
- You will see a searchable list of people. Tick the ones you want (use the Search people box to find someone quickly, or Select all / Clear).
- Click Export Selected to save the ticked people, or scroll down and click Export All Named People to save everyone who has a real name.
- Choose where to save them.

You can also export several people at once straight from the People list using multi-select.
The export list follows your visibility settings: hidden or unnamed people do not appear, and a person's hidden photos are only included when "Show hidden photos" is on.
While exporting, the progress bar at the bottom shows how far along it is, with a Cancel button. When it finishes, a summary appears with an Open Folder shortcut.
Copy or Hardlink (ADVANCED)
DO NOT USE IF YOU ARE NOT SURE
In the Export Photos screen there is a dropdown that chooses how files are saved:
- Copy (default) - makes normal, independent duplicate files. This works to any drive and is the safe choice for most people.
- Hardlink - saves space by pointing to the same data as your original, but only works when the destination is on the same drive as your photos (it falls back to Copy across drives). Because a hardlink shares its data with the original, editing the copy in another app would also change the original. Hardlink is off by default; you turn it on in Advanced Settings.
Settings Explained
Click the Settings button at the bottom-left to open Settings. The list on the left has six sections: General Settings, Themes and Accessibility, Folders to Scan, Export Photos, Advanced Settings, and About. Click the small i next to any option to read a tooltip explaining it.
General Settings
Threshold
- Controls how similar two faces must be to count as the same person.
- Lower values (around 30-40%) are more relaxed and may group different people together.
- Higher values (around 50-60%) are stricter and may split one person into several entries.
- Default: 50%.
- After changing it, click Recalibrate to regroup all faces. This is fast and does not rescan your photos.
- A good starting point is 45-50%; adjust based on what you see.
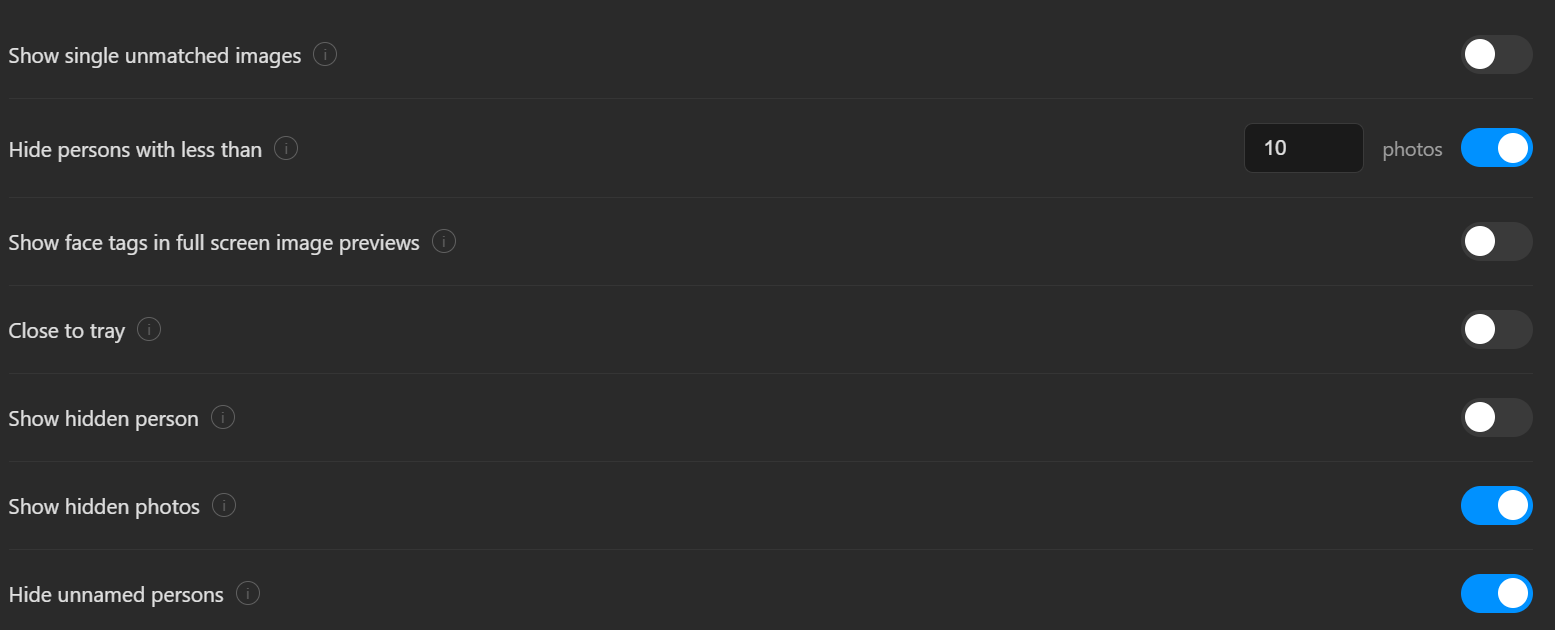
Show single unmatched images
- When ON, the app shows a group called "Unmatched Faces" for faces that do not match anyone else (often screenshots, memes, or one-off pictures).
- When OFF, those single faces are hidden.
- Default: OFF.
Hide persons with less than [N] photos
- When the toggle on the right is on, people with fewer than the number you set are hidden from the list.
- Useful for removing people who only appear once or twice.
- Default: OFF (set to 2 when turned on).
Show face tags in full screen image previews
- When ON, the large photo preview marks each person's name on the picture, so you can see who is who in group photos.
- Default: ON.
Show photo details in full screen image previews
- When ON, the large photo preview includes a side panel listing the photo's details (file name and path, image size, file size, date taken, camera, and so on). When OFF, the preview shows just the photo, using the full width.
- Default: ON.
Close to tray
- When ON, clicking the X hides the app to the system tray instead of quitting. To fully quit, right-click the tray icon and choose Quit.
- Default: ON.
Show hidden person
- When ON, people you previously hid reappear in the list with "(hidden)" after their name, so you can unhide them.
- Default: OFF.
Show hidden photos
- When ON, photos you hid reappear with diagonal lines across them, so you can unhide them.
- Default: OFF.
Hide unnamed persons
- When ON, everyone you have not renamed yet is hidden from the list. (It does not hide "Unmatched Faces".)
- Important: the first time you scan, keep this OFF so you can see and name new people.
- Default: OFF.
Rescan frequency for changes in photos
- Controls how often the app checks your folders for new or deleted photos when it starts.
- Options: after every restart; on the first restart each day; on the first restart each week; or manually only.
- If you choose Manually, you will need to use the Rescan For Changes button in "Folders to Scan" yourself.
Themes and Accessibility
Theme
- Choose Dark theme or Light theme for the whole app.
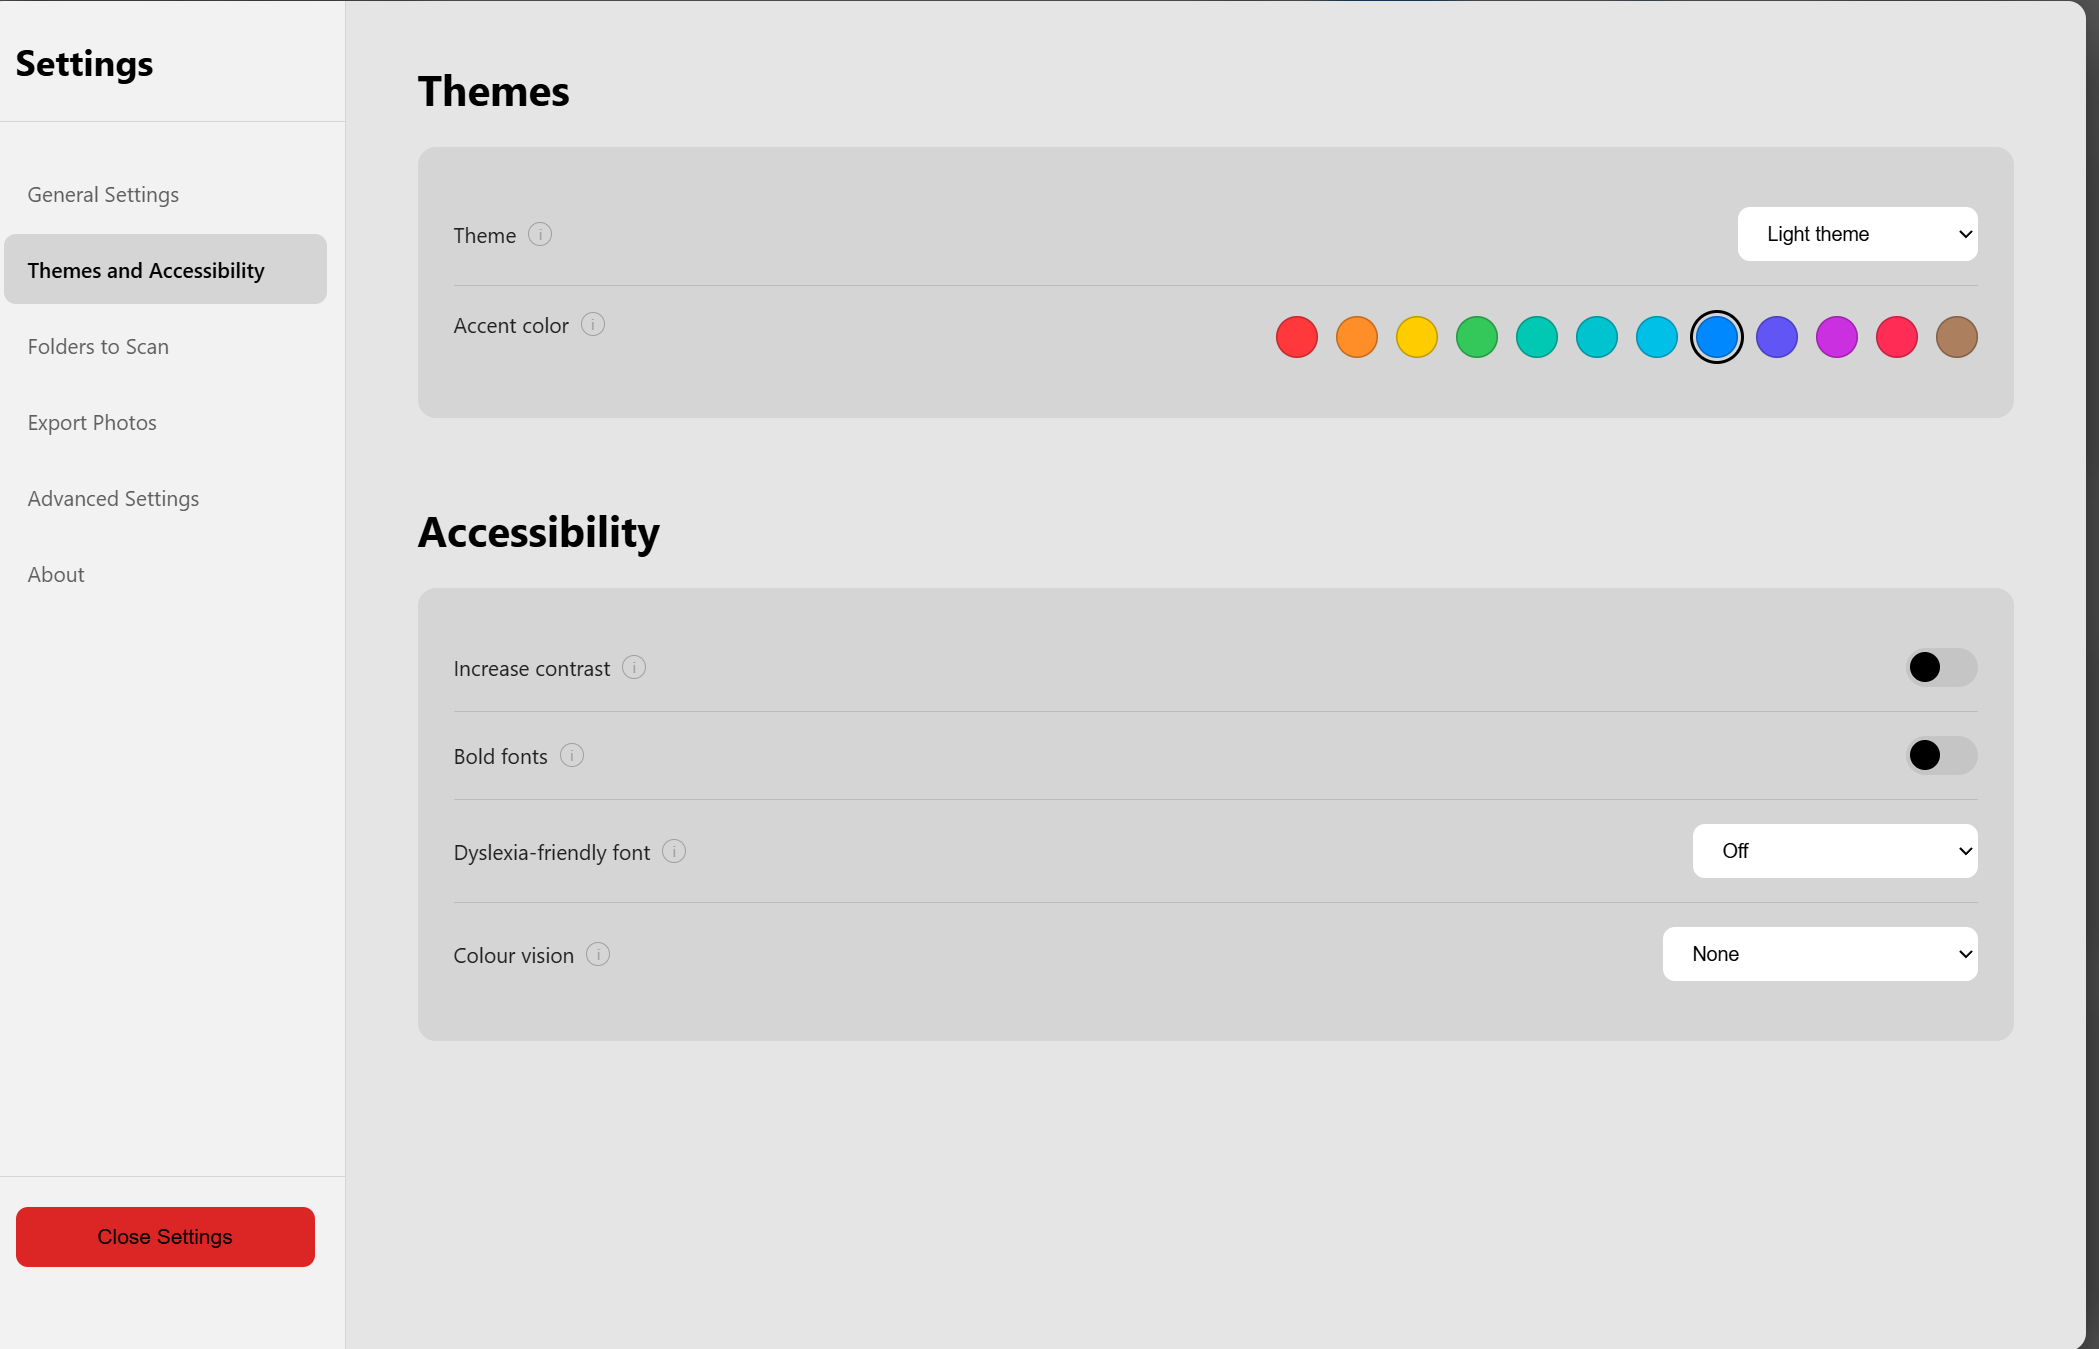
Accent color
- Click any of the 12 coloured circles to set the highlight colour used across the app (buttons, sliders, and so on). Each circle previews the exact shade for your current theme.
Increase contrast
- Adds stronger borders and higher-contrast colours, making areas that are otherwise separated only by a faint shade of grey easier to tell apart.
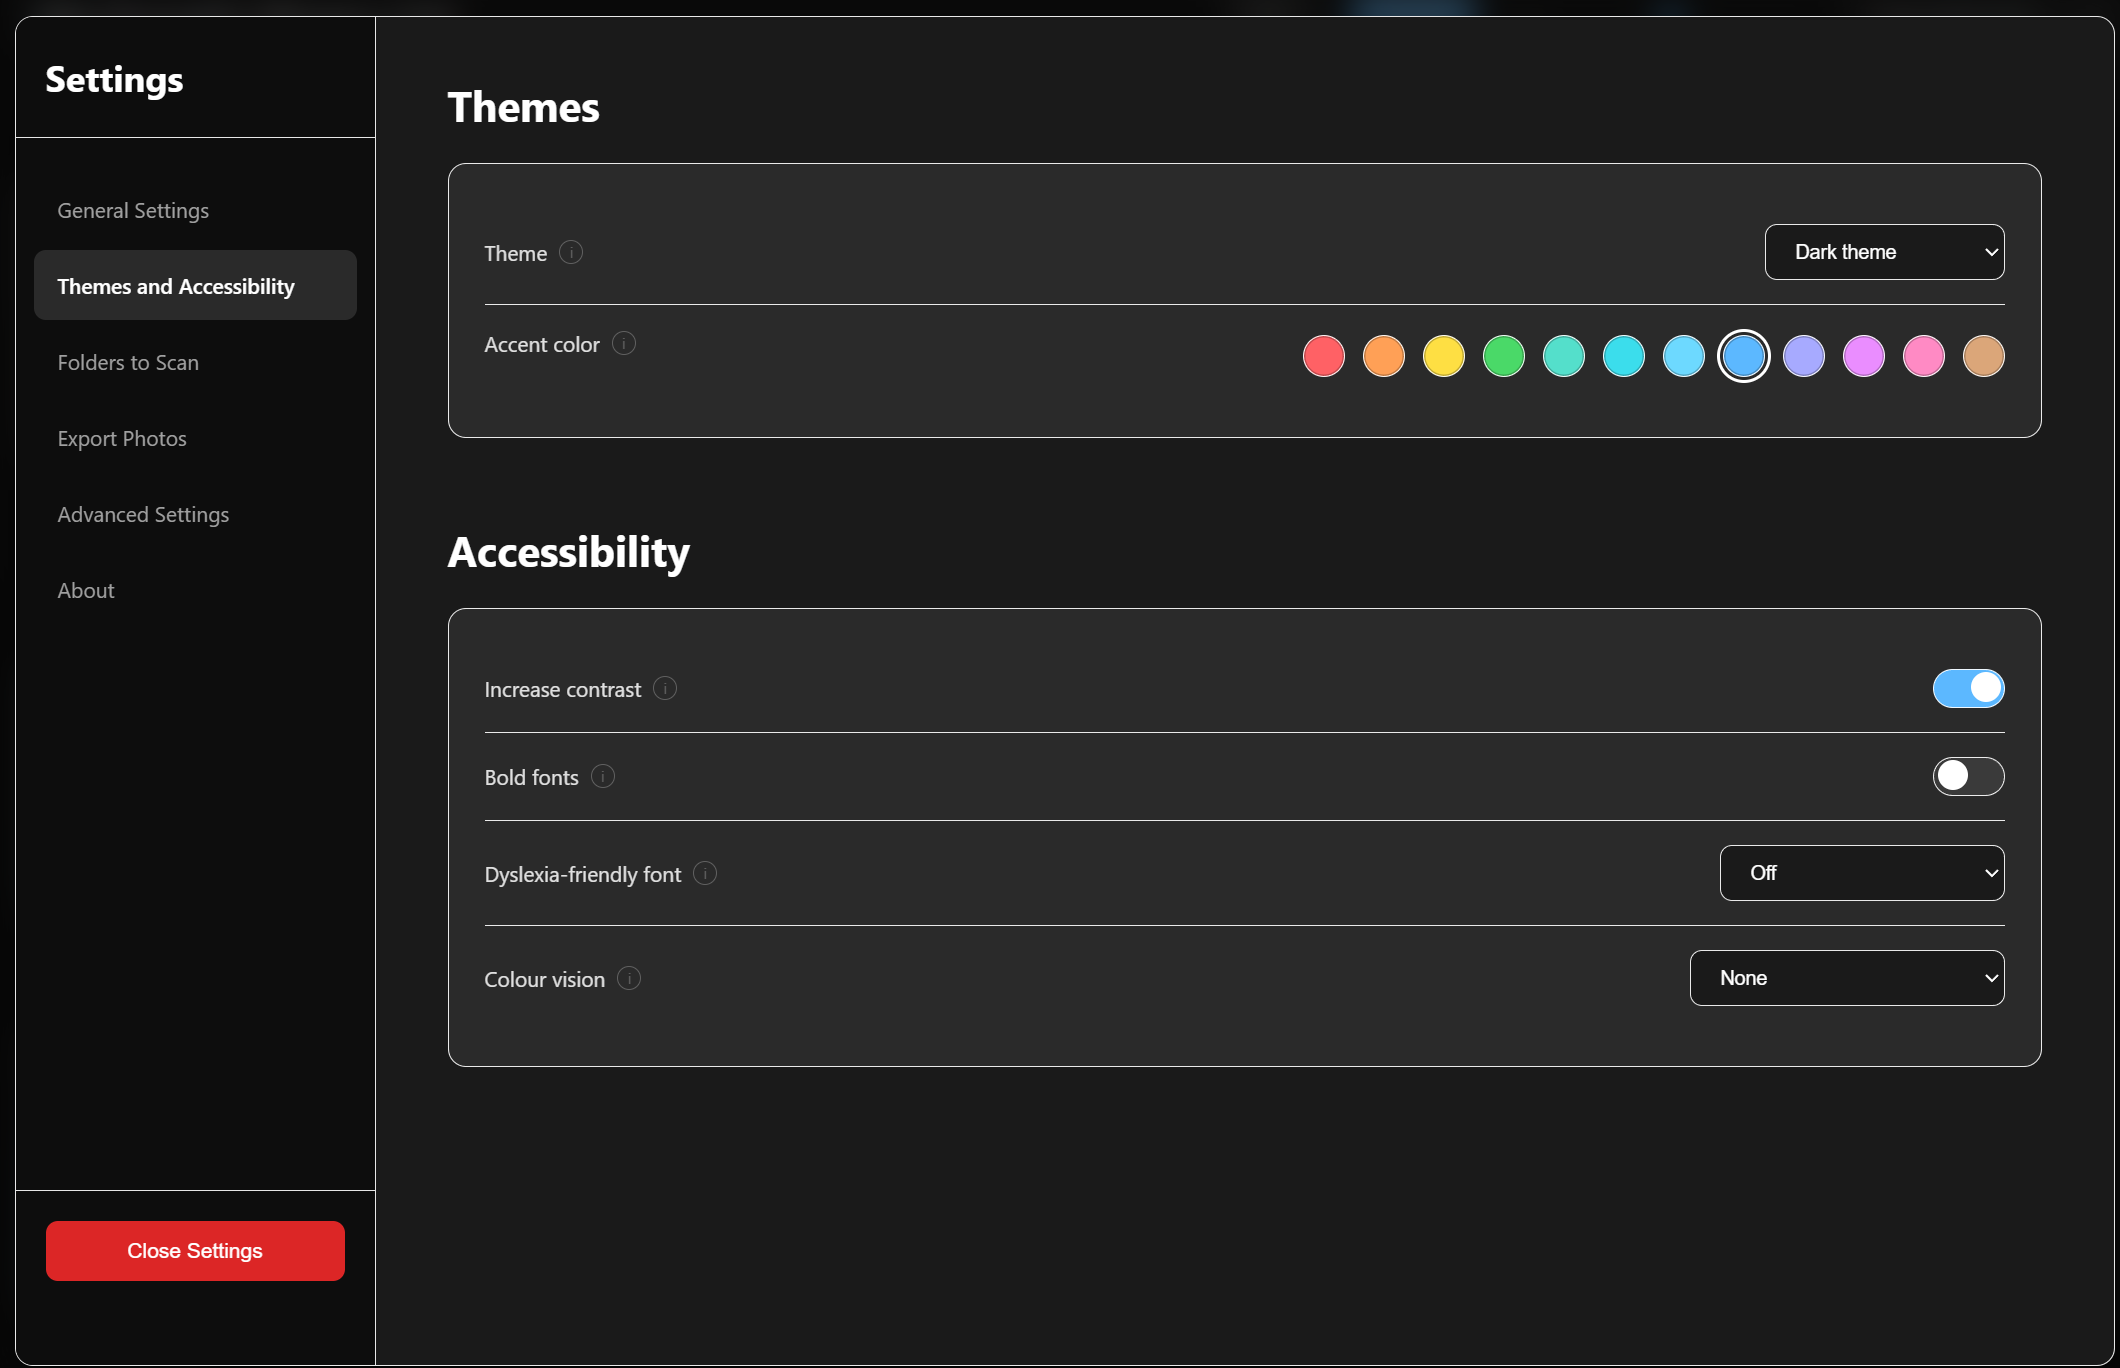
Bold fonts
- Makes the app's text heavier and easier to read. Text that is already bold is left as-is.
Dyslexia-friendly font
- Switches the app to a typeface designed to be easier to read with dyslexia. Choose Off, OpenDyslexic, or Atkinson Hyperlegible.
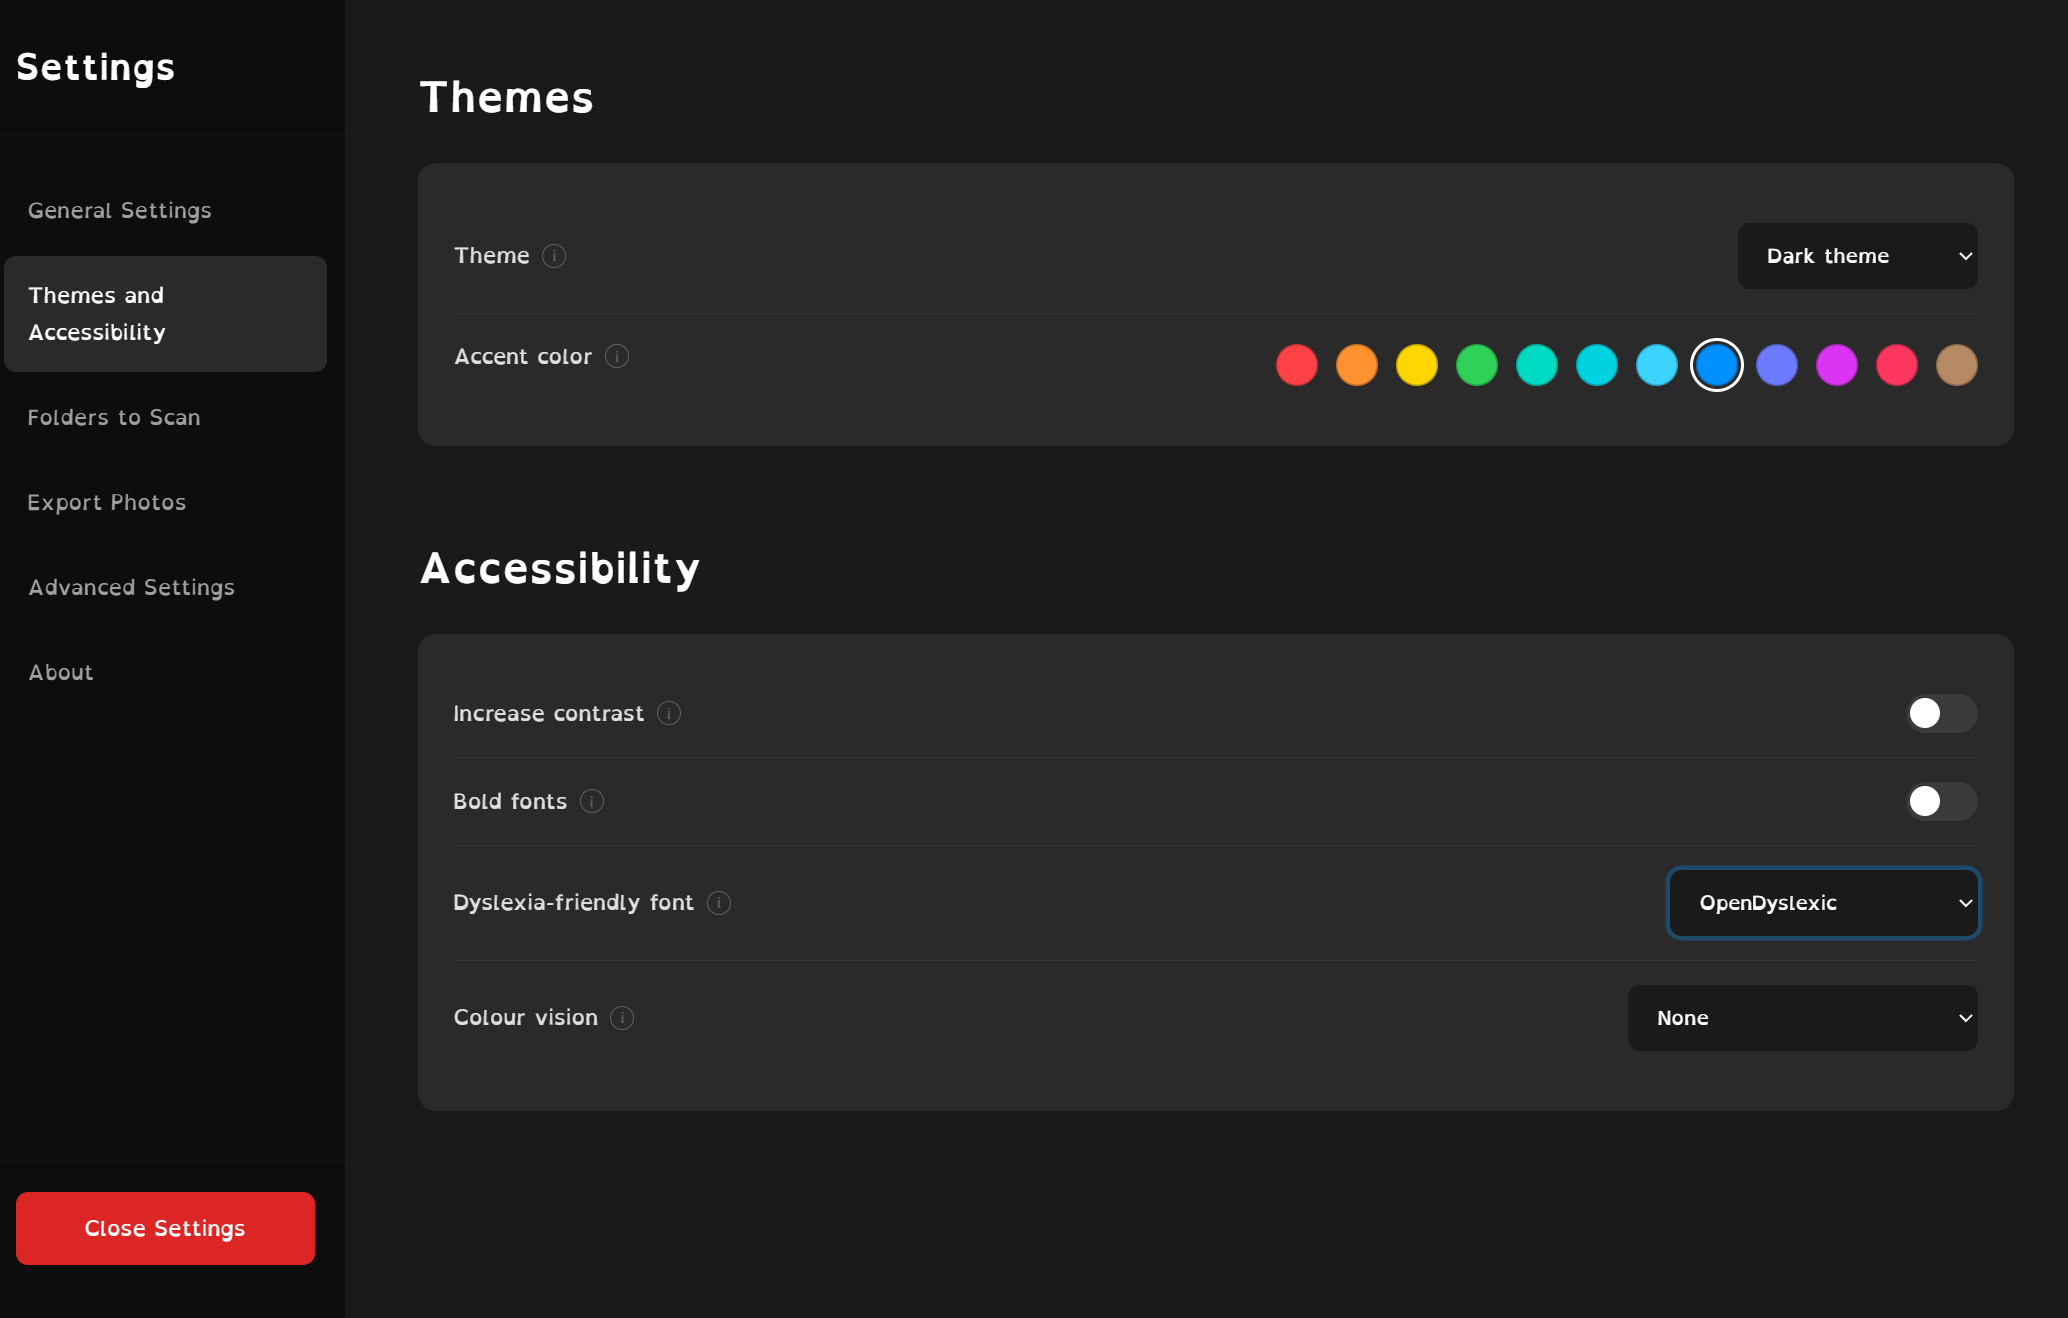
Colour vision
- Applies a colour-correction filter to help tell colours apart for a chosen type of colour blindness: None, Protanopia (no red), Deuteranopia (no green), Tritanopia (no blue), or Achromatopsia (no colour). This is an assistive approximation, not a medical tool.
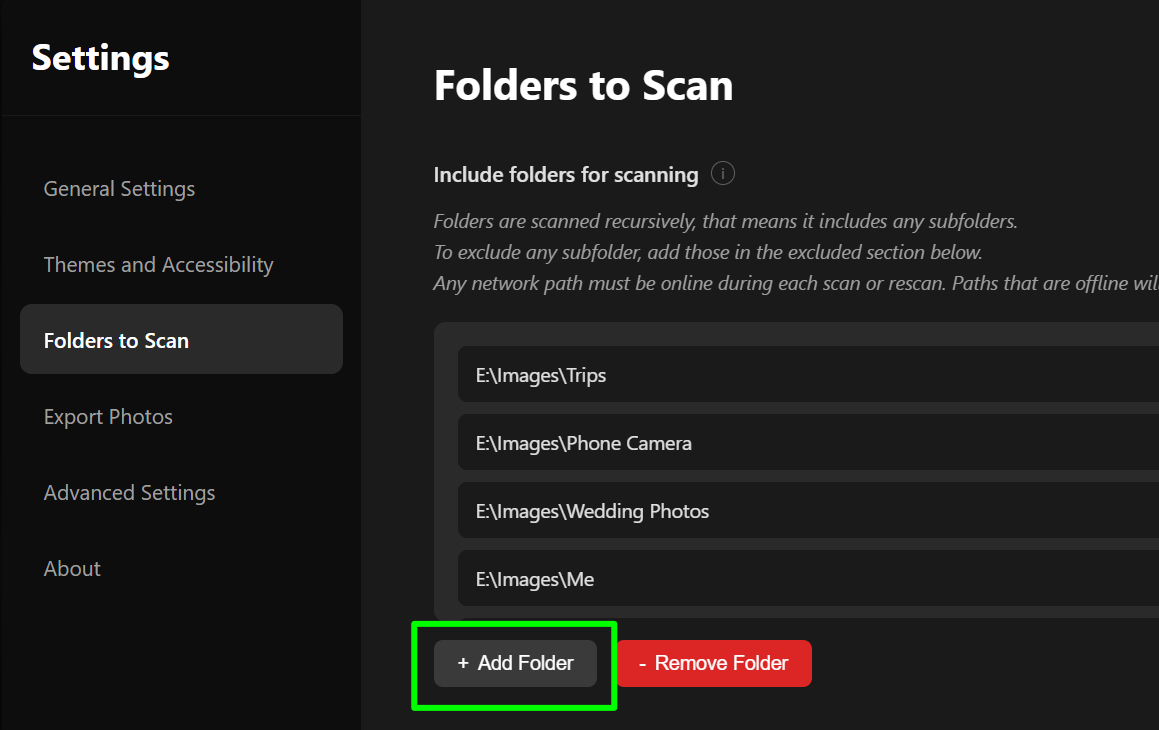
Folders to Scan
Include folders for scanning
- Add every folder that contains photos you want organised. Subfolders are included automatically.
- Use + Add Folder to add one and - Remove Folder to remove the selected one.
- Note: a network location must be online during each scan; if it is offline, its photos are treated as deleted.
Exclude subfolders from scanning
- Add specific subfolders you want skipped. This takes priority, so a folder added here is never scanned even if it sits inside an included folder.
Wildcard Exclusion
- Skip files or folders whose name matches a pattern. Separate several patterns with commas. Use
*as a wildcard:*.gif- skip every GIF file.*thumbnail*- skip anything with "thumbnail" in its name.C:\Photos\Private- skip that exact folder.
Rescan For Changes
- Click this to check your folders right now for new or deleted photos. Use it after you add or remove photos on your computer.
Export Photos
This section lets you export several people or everyone at once. See Exporting Photos into Folders for full steps. In short: tick people in the list (or Select all), choose Copy or Hardlink, and click Export Selected - or use Export All Named People to export everyone with a real name.
Advanced Settings
These are extra options most people will not need to change.
Use system resources dynamically
- When ON, the app eases off your computer when it is minimized to the tray, so it does not slow down your other work. When OFF, it always runs at full speed.
- Default: ON. (To benefit from this, use "Close to tray".)
Show development options
- Shows extra technical information, such as how many faces are tagged for each person, and a "Remove all tags" option in a person's menu. Most people should leave this OFF.
- Default: OFF.
Thumbnail Cache
- Shows how much space the saved thumbnails use, with a Clear Cache button. Thumbnails make photos load quickly; clearing them is helpful if photos look wrong after being edited outside the app. They rebuild automatically the next time you open a person.
Hardlink export (ADVANCED)
- Turns on the Hardlink option in the Export Photos screen (see Copy or Hardlink). Off by default.
Write XMP sidecar files (ADVANCED)
- Lets the app save the face names into small files next to your photos so other photo apps can read them. See Sharing Names with Other Photo Apps (XMP) below for full details.
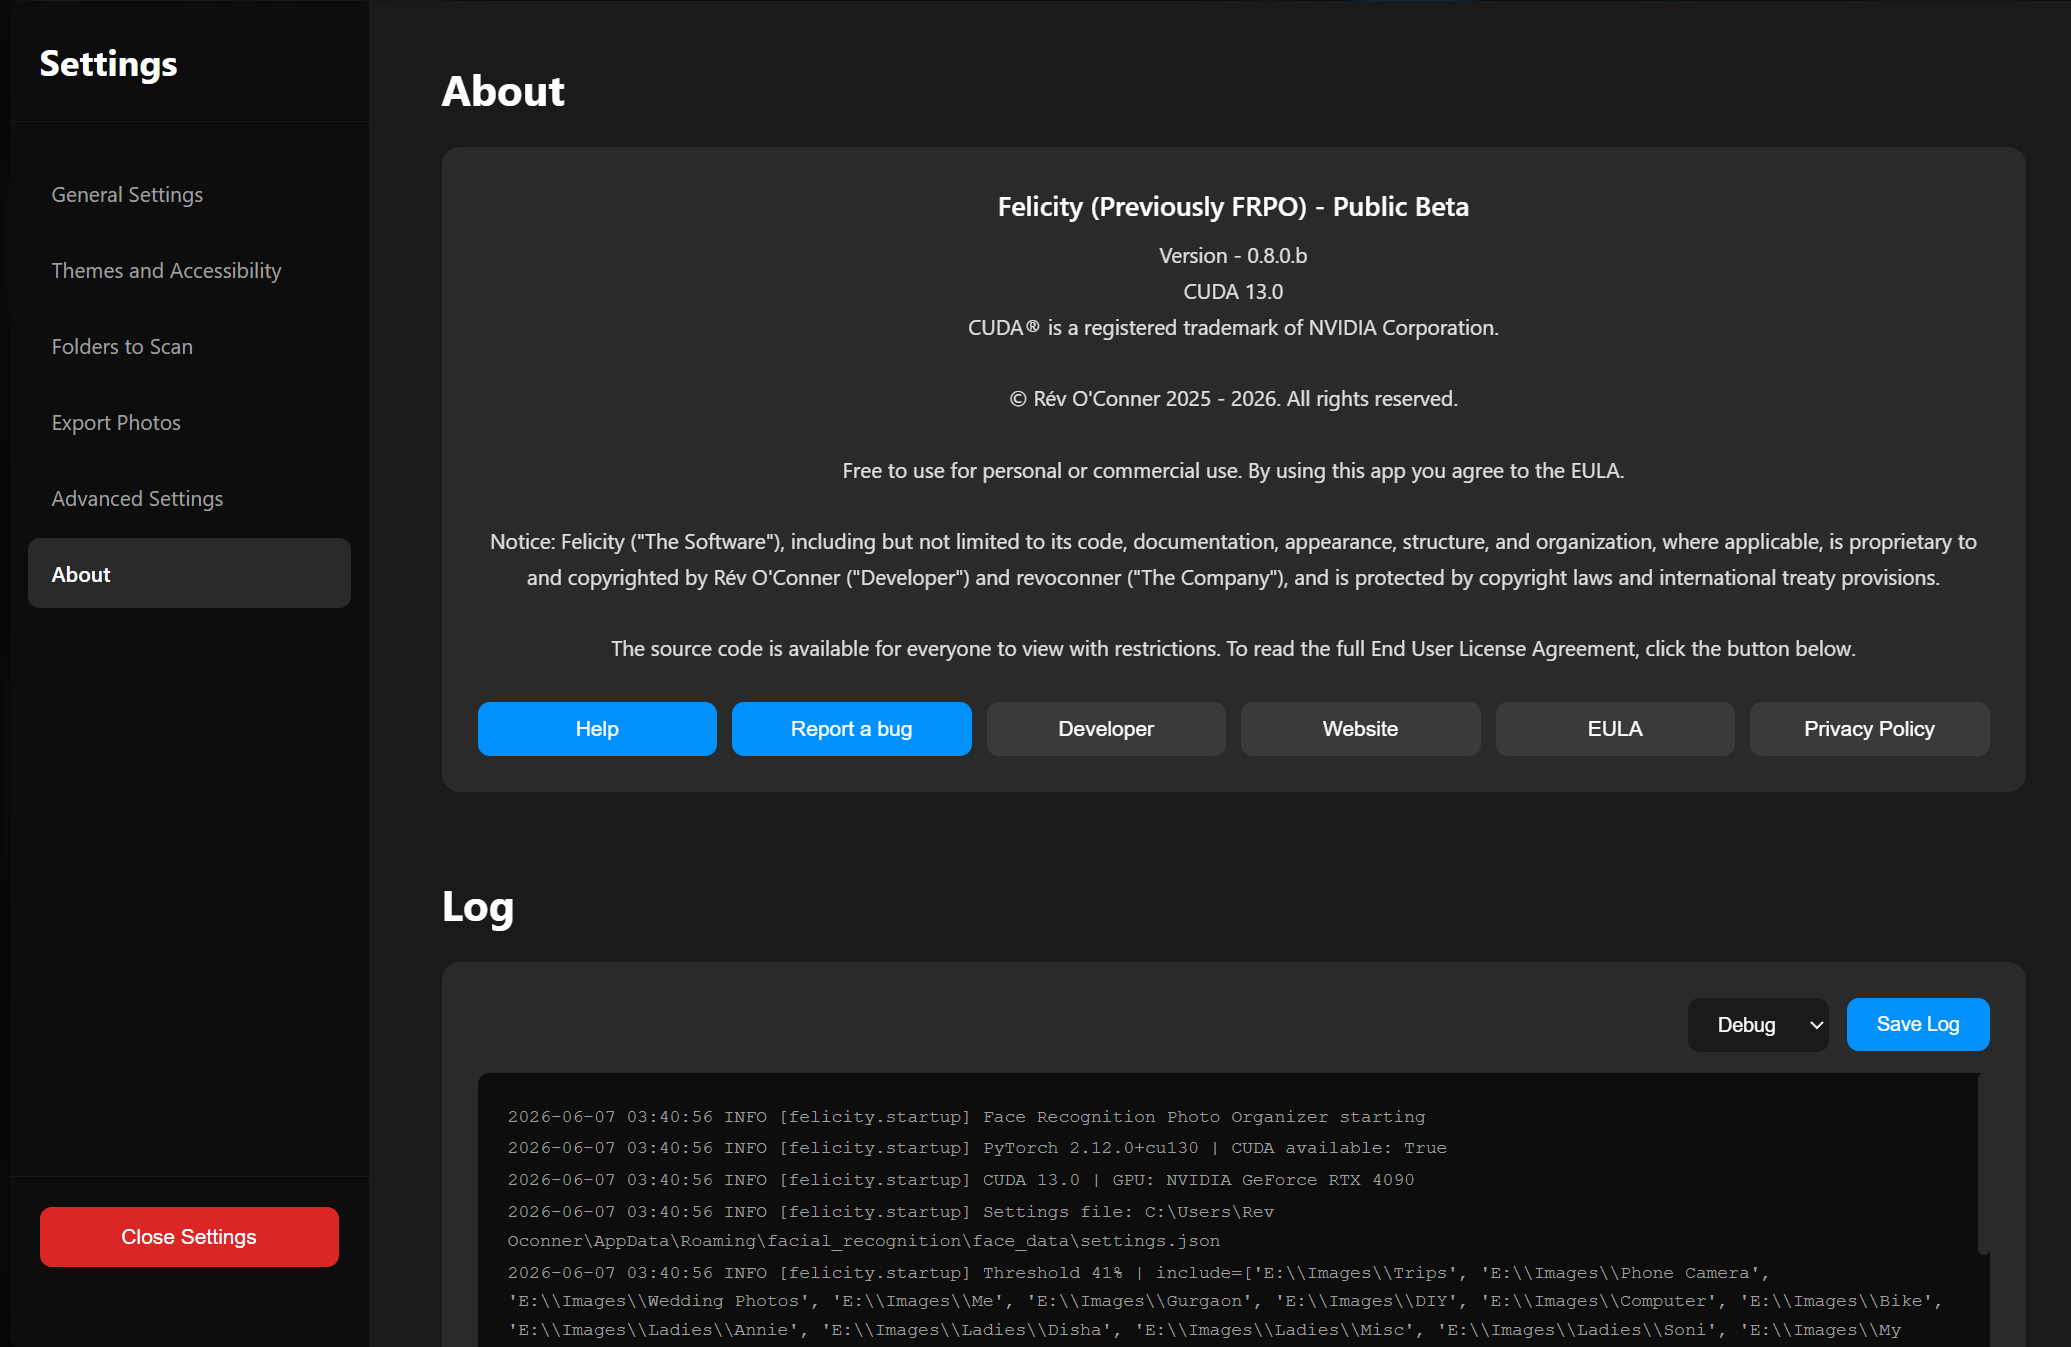
About (and the Log)
The About section shows the version and licence information, plus a row of buttons:
- Help - opens a small window with links to the online help and an offline help PDF.
- Report a bug - opens the page where you can report problems.
- Developer, Website, EULA - open the matching web pages.
- Privacy Policy - explains that the app does not collect any data.
Below About is the Log. The log lists what the app has done (scanning, errors, settings changes, and so on). You can:
- Choose Normal or Debug detail from the dropdown. Use Debug only when you are chasing a problem.
- Click Save Log to save it as a text file, which is helpful when reporting a bug.
Sharing Names with Other Photo Apps (XMP)
This is an optional feature for people who also use other photo software such as digiKam or Lightroom. When turned on, the app writes a small .xmp file next to each tagged photo that records where each face is and who it is, so those other apps can show the same names.
This is the only feature that writes anything into your photo folders, so it asks for your permission once before turning on.
To turn it on:
- Open Settings and click Advanced Settings.
- Turn on Write XMP sidecar files.
- A message appears explaining what it does. Read it, tick I understand, and click Confirm.
- A list of your scan folders appears under "Folders to write XMP into". Click the folders you want the
.xmpfiles written into. Only the folders you pick will get them.
Important points to know:
- The
.xmpfiles are written on the next scan (so trigger a rescan, or wait for the app's normal rescan, after turning it on). - Your original photos are never changed - the names go into separate small files beside them.
- These
.xmpfiles live on your disk next to your photos. Uninstalling the app does not remove them, and turning the feature off later does not delete files already written - you would remove those yourself. - Only people you have named are written. People and photos you have hidden follow the same show/hide rules as exporting.
Tips and Best Practices
Start with the default settings
- Use the 50% threshold first, scan your photos, then adjust up or down based on the results.
- I personally use 41%.
Adjust the threshold based on what you see
- Different people grouped together? Raise the threshold and click Recalibrate.
- One person split into several entries? Lower the threshold and click Recalibrate.
Name people as you go
- Once someone is named, the app remembers them forever, and new photos of them appear under their name automatically.
Be patient during the first scan
- The first scan is the slowest and only happens once. You can minimize the app to the tray and keep using your computer; with "Use system resources dynamically" on, it steps aside while minimized.
Reduce clutter
- Hide "Unmatched Faces", or use "Hide persons with less than" a couple of photos, to focus on the people who matter.
Pin and multi-select
- Pin your most important people to the top, and use Ctrl-click / Shift-click to act on several people at once.
Adding new photos later
- When you add photos to your folders, open the app and they are picked up on the next scan (depending on your rescan frequency). You can also force it: Settings > Folders to Scan > Rescan For Changes. New photos of people you have already named appear under their names automatically.
Keyboard and Mouse Actions
In the photo grid
- Single-click a photo - open the large preview.
- Double-click a photo - open it in your normal image viewer.
- Right-click a photo - photo menu (Make primary photo, Remove/Transfer Tag, Hide photo).
In the people list
- Click a person - view their photos.
- Ctrl-click - add or remove a person from a multi-selection.
- Shift-click - select a range of people.
- Right-click (or three-dot menu) - person menu.
- Esc - clear the selection.
In the photo preview (lightbox)
- Left Arrow - previous photo.
- Right Arrow - next photo.
- Esc - close the preview.
Common Questions
Why is one group called "Unmatched Faces"? This is a special group for faces that do not match anyone else - usually screenshots, memes, profile pictures, or people who appear only once. You can hide it from General Settings ("Show single unmatched images" off).
Will the app change my original photos? No. The app only reads your photos. It never edits, moves, or deletes the original files. All organising happens in the app's own database. (The optional XMP feature writes separate small files next to your photos, but still never changes the photos themselves.)
What happens if I delete photos from my computer? The next time the app scans, it removes those photos from its list automatically.
Can I use this on more than one computer? The app stores its data in your user account on each computer, so each machine keeps its own separate list. You would scan and organise on each computer separately.
Where is my data stored?
In C:\Users\[YourUsername]\AppData\Roaming\facial_recognition\face_data, which you can also reach by typing %appdata%\facial_recognition\face_data into the address bar. This holds the photo list and face data. Your original photos stay where they are.
Can I back up my data? Yes. Back up the folder above to keep all your names and organisation. Restore that folder to recover everything.
Why does the app use a lot of CPU or GPU? Recognising faces is heavy work. The app uses your graphics card when it can to go faster. Turn on "Use system resources dynamically" to ease off while the app is minimized.
Troubleshooting
The app takes a long time to start
- This is a known issue on the first start. Later starts are quicker.
It seems stuck loading photos
- For a person with a very large number of photos, the first load can take a moment while thumbnails are built. After that it is fast.
The app will not start scanning
- Make sure you have added at least one folder in Settings > Folders to Scan.
- Check the folder path is correct and the drive is available.
- Try Settings > Folders to Scan > Rescan For Changes.
No faces are found
- Make sure the photos actually contain visible faces.
- Check the files are a supported type (JPG, PNG, HEIC, and so on).
- Very small or blurry faces may not be detected.
The same person shows up as several different people
- Raise the Threshold in General Settings and click Recalibrate. Try 50-60%.
Different people are grouped together
- Lower the Threshold and click Recalibrate. Try 30-40%.
The app feels slow or freezes
- Turn on "Use system resources dynamically", minimize to the tray while scanning, and close other heavy programs. The first scan is always the slowest.
Photos will not open in my image viewer
- Make sure Windows has a default app set for image files. You can set one by right-clicking an image in File Explorer and choosing "Open with".
A name disappeared after recalibration
- This should not happen; names are tied to faces and should always persist. If it does, please report it as a bug.
Thumbnails look wrong or do not match the face
- Go to Settings > Advanced Settings and click Clear Cache. The thumbnails rebuild automatically the next time you open that person (which may take a moment for someone with many photos).
Photos on a network drive show as deleted
- The network location must be online during each scan. If it is offline when the app scans, those photos are treated as deleted. Make sure the drive is connected, then rescan. (To use a network share, map it to a drive letter in Windows and add that drive letter as a folder to scan.)